22 May 2018
Instead of the common FPS/RPG/Platformer, for some reason I decide to
create a clone of the old micromachine, in particular the elimination
mode when players are eliminated when they are too far away from the
first player.
As the game was creating itself in my head, I stumbled against a
mathematical obstacle in the first week of prototyping. How to determine
which player is the first? How to determinate what path the AI should
follow.
It turns out that part of the answer is to represent tracks as a curve,
and Bezier curves are used in a bunch of applications from photoshop to
font creation. To find out what player is first, I would just have to
calculate the position of all pilots on the tracks.
Some reading before getting started
This article will be introducing a bit a linear algebra. In particular,
we will apply translation and rotation to our vectors. Also, we need to
find the roots of a quadratic equation. The maths are not too
complicated but feel free to read the following links beforehand:
This article builds on an existing article which can be found here:
https://catlikecoding.com/unity/tutorials/curves-and-splines/ It shows
how to implement a Bezier curve in Unity, showing at the same time how
editor scripts work.
The last resource is an ebook called “A primer on Bezier”. It can be
found here. This ebook contains
all you need to know about Bezier curves, theory and pseudocode
included.
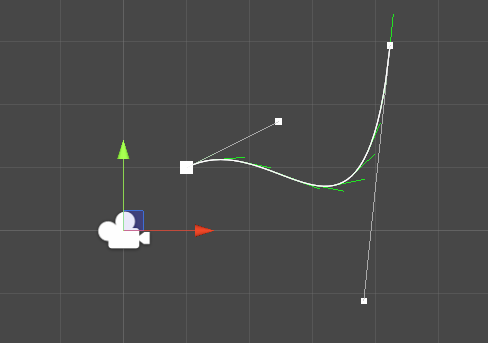
Bounding box
Bounding box are useful. In my use case, I want to find the closest
point to the spline so bounding boxes will help determine what bezier
curve I should select to do the calculation!
The way to find the bounding box is to get the minimum/maximum along the
x and y axis and create the boxes from (, ), (,
), (, ), (, ).
However, this has the tendency to create large bounding boxes so we can
get tighter boxes by aligning them along our curve. (Part 17 - Bounding
box)
Beforehand, define the curve
Curve is such as
where are the control points of the curve, in
global coordinates.
Align the curve on an axis.
To align the curve, we first need to apply a translation T to the first
point of the curve in order to place it on the origin (0, 0). We have
.
// Translation such as p0 is at (0,0)
Vector2 [] translatedVector = new Vector2[] {
    p0 - p0,
    p1 - p0,
    p2 - p0,
    p3 - p0
};
Then, we need to apply the rotation so that $P_3$ is on the x-axis.
Given x and y the coordinates of $P_3$, x’ and y’ the coordinates after
rotation $\theta$, we have the equations:
\begin{equation}
x’ = xcos(theta) - ysin(theta)
y’ = ycos(theta) + x sin(theta)
\end{equation}
Don’t take my word for granted
:)
private static Vector2 Rotate(Vector2 p, float theta) {
    // x' = x cos f - y sin f
    // y' = y cos f + x sin f
    float xp = p.x * Mathf.Cos(theta) - p.y * Mathf.Sin(theta);
    float yp = p.y * Mathf.Cos(theta) + p.x * Mathf.Sin(theta);

    return new Vector2(xp, yp);
}
We find theta such as .
// Find rotation such as translatedVector[3] is on the axis
Vector2 pp3 = translatedVector[3];
float theta = Mathf.Atan(-pp3.y/pp3.x);
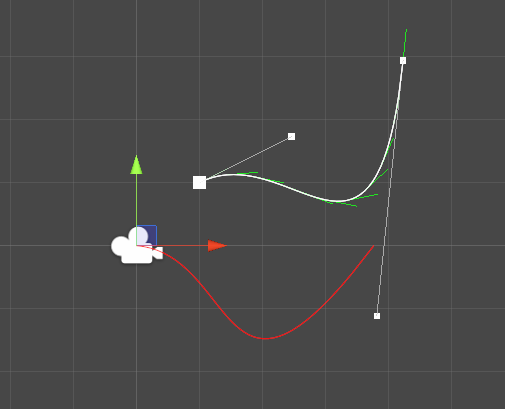
Just for fun, let’s draw the Bezier curve after rotation.
public static Vector2[] GetAlignedCurve(Vector2 p0, Vector2 p1, Vector2 p2, Vector2 p3) {

    // Translation such as p0 is at (0,0)
    Vector2 [] translatedVector = new Vector2[] {
        p0 - p0,
        p1 - p0,
        p2 - p0,
        p3 - p0
    };

    // Find rotation such as translatedVector[3] is on the axis
    Vector2 pp3 = translatedVector[3];
    float theta = Mathf.Atan(-pp3.y/pp3.x);

    // Now calculate new vectors.
    return new Vector2[] {
        Rotate(p0 - p0, theta),
        Rotate(p1 - p0, theta),
        Rotate(p2 - p0, theta),
        Rotate(p3 - p0, theta)
    };
}
When adding the aligned curve to the editor script, we get the
following.
Find the bounding box for the aligned curve
Once we have our aligned curve, we need to find its bounding box. To do
so, we need to calculate the roots of the curve for x and y in order to
get the minimum and maximum on the axis for t between 0 and 1.
To get an idea about why we want the minimum and maximum of a curve,
please refer to my amazing drawing. 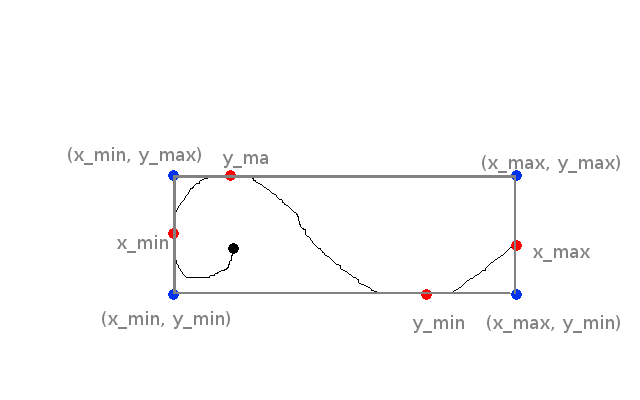
In this piece of art, the maximum and minimum of y are located on the
curve. For x however, only the minimum x is located on the curve. The
maximum is one of our control point. This is why we absolutely have to
include the first and last control points when we want to find the
minimum and maximum on each axis.
For a quadratic or cubic Bezier curve, it is very easy to find the
minimum and maximum for each axis. The way to do it is to calculate the
derivate of the curve, and find the t values for which this derivative
is 0. These values are called the roots of the curve for the x or y
axis. The Wikipedia article at the top of the blog article explains it
more deeply.
After deriving the Bezier equation and simplifying it a bit, we obtain:
Where $x_{p_i}$ is the x coordinate of the point i. There is the same
equation for y. Now that we have reduce our equation to a simple
quadratic equation, the solution is textbook.
$\Delta$ (Delta) is the discriminant. We can find imaginary roots (that
cannot be represented in our 2D space) when delta is negative, so here
we are just interested about the real roots, meaning when $\Delta >= 0$.
The two roots (which can be only one is the discriminant is 0) for the
axis x are:
Notice that when $\Delta$ is 0, $t_1$ and $t_2$ are the same. For our
Bezier curve, we only care about parameter between 0 and 1 so the roots
might not be usable. In C#, there is not much complexity. Just write
down the last equations and filter the values.
/*
  Find the roots of a cubic bezier curve in order to find minimum and maximum
 */
private static List<float> FindRoots(Vector2 p0, Vector2 p1, Vector2 p2, Vector2 p3) {
    Vector2 a = 3 * (-p0 + 3*p1 - 3*p2 + p3);
    Vector2 b = 6 * (p0 - 2*p1 + p2);
    Vector2 c = 3 * (p1 - p0);

    List<float> roots = new List<float>();

    // along x
    float discriminantX = b.x * b.x - 4 * a.x * c.x;
    if (discriminantX < 0) {
        // No roots
    } else if (discriminantX == 0) {
        // one real root
        float rootx = (-b.x) / (2 * a.x);
        if (rootx >=0 && rootx <= 1) {
            roots.Add(rootx);
        }
    } else if (discriminantX > 0) {
        // Two real roots
        float rootx1 = (-b.x + Mathf.Sqrt(discriminantX)) / (2 * a.x);
        float rootx2 = (-b.x - Mathf.Sqrt(discriminantX)) / (2 * a.x);
        if (rootx1 >=0 && rootx1 <= 1) {
            roots.Add(rootx1);
        }
        if (rootx2 >=0 && rootx2 <= 1) {
            roots.Add(rootx2);
        }
    }

    // along y
    float discriminantY = b.y * b.y - 4 * a.y * c.y;
    if (discriminantY < 0) {
        // No roots
    } else if (discriminantY == 0) {
        // one real root
        float rooty = (-b.y) / (2 * a.y);
        if (rooty >=0 && rooty <= 1) {
            roots.Add(rooty);
        }
    } else if (discriminantY > 0) {
        // Two real roots
        float rooty1 = (-b.y + Mathf.Sqrt(discriminantY)) / (2 * a.y);
        float rooty2 = (-b.y - Mathf.Sqrt(discriminantY)) / (2 * a.y);
        if (rooty1 >=0 && rooty1 <= 1) {
            roots.Add(rooty1);
        }
        if (rooty2 >=0 && rooty2 <= 1) {
            roots.Add(rooty2);
        }
    }

    return roots;
}
(You can even refactor this to do the calculation once! When reading
back this code I noticed that I was a bit lazy here).
Now, our minimum and maximum along x and y would be one of the point
that has a parameter t, where t is either a root, 0 or 1.
List<float> roots = FindRoots(pa0, pa1, pa2, pa3);


// Initialize min and max with the first point
float min_x = Mathf.Min(pa0.x, pa3.x);
float max_x = Mathf.Max(pa0.x, pa3.x);
float min_y = Mathf.Min(pa0.y, pa3.y);
float max_y = Mathf.Max(pa0.y, pa3.y);

for (int i = 0; i < roots.Count; i++) {
    float param = roots[i];
    Vector2 point = GetPoint(pa0, pa1, pa2, pa3, param);

    if (point.x > max_x) {
        max_x = point.x;
    }

    if (point.x < min_x) {
        min_x = point.x;
    }

    if (point.y > max_y) {
        max_y = point.y;
    }

    if (point.y < min_y) {
        min_y = point.y;
    }
}
We have our $x_min$, $x_max$, $y_min$, $y_max$. This is all we need for
drawing the bounding box.
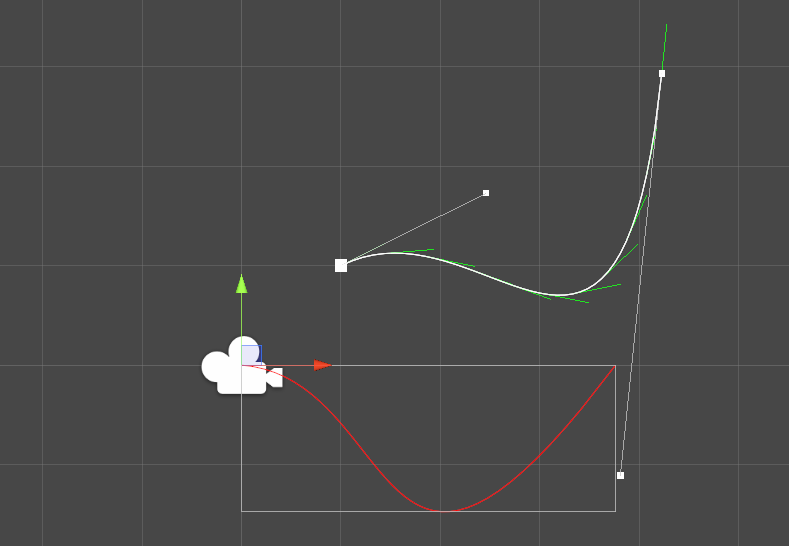
Rotate the box back
Almost there! At this point, we have the bounding box of the aligned
curve. To get the aligned curve, we applied two transformations to our
Bezier curve: first a translation, then a rotation. To get back to the
original curve, you can simply do the inverse! First, rotate the aligned
curve by the opposite of the first rotation ($-\theta$), then translate
it by the opposite of the first translation ($-P_0$).
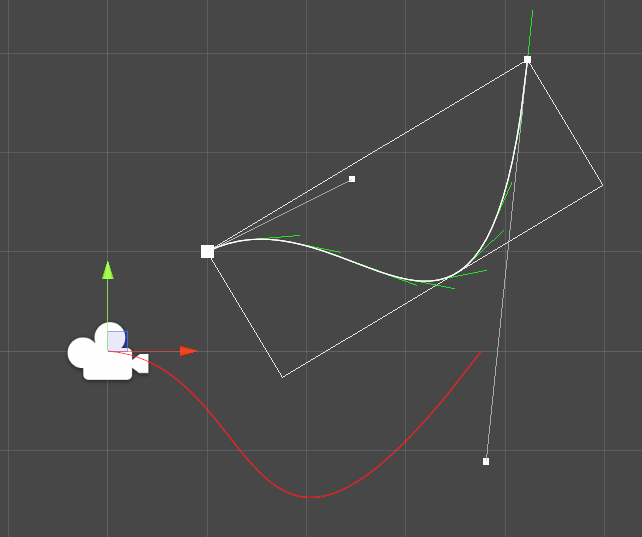
We can do the same with the bounding box, and it should fit our original
Bezier curve!
With the previous minima and maxima:
return new Vector2[] {
    Rotate(new Vector2(min_x, min_y), -theta) + p0,
    Rotate(new Vector2(min_x, max_y), -theta) + p0,
    Rotate(new Vector2(max_x, min_y), -theta) + p0,
    Rotate(new Vector2(max_x, max_y), -theta) + p0,
};
Which gives us, at last:
What’s next?
All this to find the bounding boxes of each curve in our Bezier spline!
While it looks like a lot of work, these bounding boxes are really going
to help us find the projection of a point on the spline.
Instead of having to consider all the spline, now we can just reduce the
problem to a list of Bezier curves. Calculating distance to a box is
pretty simple, so we just need to find the closest boxes to our point
and for each curve, finding the closest point. This will be done by an
iterative approach (mathematical approach is out of the question here -
spoiler alert), so keep tuned for the next article.
02 May 2018
More often than not, working in a IT project requires a lot of
repetitive tasks. In particular, one area that can be very debilitating
is the creation of test data. We know it is indispensable to the
project, but it does not make that task less boring.
Let’s consider this example
You are working in a Java project. One of the thing to test is the
validation logic of some input XML files. One object, called the
XmlInputSuperbEnterpriseValidator (notice the Java naming convention),
takes a XML file path as input and return true if the file is valid.
Input file is just a simple XML file, which could look like this:
<root>
  <value1>1</value1>
  <value2>a</value2>
</root>
where value1 accepts number between 0 and 9 and value2 accepts letters
(a-z).
To test this, one can create a test class like the following.
package com.core.validator;

import static org.junit.Assert.*;

public class XmlInputSuperEnterpriseValidatorTest {

    @Test
    public void 01_normalInput_returnsTrue() {
         assertTrue(XmlInputSuperbEnterpriseValidator.validate("input/01.xml"));
    }
}
Then, for each test case, create the XML file and add exactly the same
test function.
When things go sideways
What if you have 50 different permutations of XML file. You’ll need to
create all of them and create the exact same test methods. And what if
the specification change and you have to add new fields? Here again, a
lot of manual operation will be required to update the test cases.
What could happen here is that the tests will just be thrown away as the
maintenance is taking more effort that most people are willing to give.
As a good little software engineer, one of the question that should pop
out of your mind is: “Isn’t there a better way to do that?”
Of course there is a better way
It’s not rocket science, but using python (or any other language really)
to automate the test creation will save you a bunch of time and also
make everybody in the project happier.
The basic workflow is the following:
- Create test data definition: It could be just a simple text file
that describes the tests you want to run.
- Run the script to generate the data and the test class
- Run the tests and enjoy
Test definition
The test definition is the input of the generator. We need to specify
what kind of test data we want to generate. In this example, we want to
generate tests that will try all possible permutations for value1 and
value2 of the input file.
The format of the test definition is up to you; here we will just use
plain text.
1,2,3,4,5,6,7,8,9
a,b,c,d,e,f,g,h,i,j,k,l,m,n,o,p,q,r,s,t,u,v,w,x,y,z
Generating the test data and test class
Representing our test data in Python
First things first, let’s create a class that will represent the data
for one test:
import os

class TestData:

    def __init__(self, name, path, value1, value2):
        self.value1 = value1
        self.value2 = value2
        self.path = path
        self.name = name
We have our test data representation, great. Now we need a way to
convert it to text. We could just use Python string interpolation but
there is a much better way.
Templating language, Yokoso
A very neat way to generate text file in python is to use a templating
language. Web frameworks, such as Django or Flask, are heavy users of
templating language to generate the HTML pages from data coming from the
server.
Here, we will use jinja2 to
generate our XML and java files. First, define the template using jinja
templating language. Quick way is just to define it as a string in the
python file but it can also be read from file, which is better practice
when the templates are getting bigger and more numerous.
XML_TEMPLATE = """<root>
    <value1></value1>
    <value2></value2>>
</root>
"""
Notice the curly brackets? Jinja will replace what’s inside by whatever
objects we pass. Object should have variables ‘value1’ and ‘value2’ to
work.
The next snippet will print this template with a test case object.
from jinja2 import Template

if __name__ == "__name__":
    template = Template(XML_TEMPLATE)
    test_case = TestCase('name', 'path', 'value1', 'value2')
    print(template.render(test_case=test_case)
We insert the test~case~ variable in the template by passing it as a
keyword argument of the render method of jinja2.Template. This will
print:
<root>
    <value1>value1</value1>
    <value2>value2</value2>>
</root>
Creating the template for the java test class can be done in a similar
fashion. Here, we will leverage the for loop of jinja.
JAVA_TEMPLATE = """
package com.core.validator;

import static org.junit.Assert.*;

public class XmlInputSuperbEnterpriseValidatorTest {


}

"""
The variable to insert in the template is test~cases~. It should be an
iterable as we use it in the for loop. Here how to generate 1000 test
cases with the java class to test them.
from jinja2 import Template

if __name__ == "__name__":
    java_template = Template(JAVA_TEMPLATE)
    xml_template = Template(XML_TEMPLATE)

    path_out = "/somewhere/you/want/"
    test_cases = [TestCase("{}_test".format(i),
                           path_out,
                           i,
                           i+1) for i in range(0, 1000)]
    # Create the java file
    with open(path_out + 'XmlInputSuperbEnterpriseValidatorTest.java', 'w') as f:
        f.write(java_template.render(test_cases=test_cases)

    # Create the xml files
    for test_case in test_cases:
        with open(path_out + test_case.path + test_case.name, 'w') as f:
            f.write(xml_template.render(test_case=test_case))
Instead of printing the rendered templates to the console, we will just
write them to a file.
Glue everything together
We have a way to represent our tests, we have a way to print our tests
to file, we just need to have a way to read our test specification and
convert it to a TestCase object.
Our input file first line is the value1, and the second line is the
value2. To avoid cluttering the blog post, I will assume the file is
always correct and has as many elements in the first line than in the
second line.
with open('test_specification') as f:
    test_input_values = [x.rstrip().split(',') for x in f.readlines()]
values1 = test_input_values[0]
values2 = test_input_values[1]
Then you can combine these value the way you want to create your test
cases.
Using zip:
test_cases = [TestCase('{}_test'.format(nb),
                       path_out,
                       value1,
                       value2) for nb, (value1, value2) in enumerate(zip(values1, values2))]
zip will create a generator from many iterables. The ith element of a
zip object is a tuple containing the ith elements of each of the input
iterables. For example,
for a, b in zip([1, 2], [3, 4]):
    print("{} - {}".format(a, b))
Will print “1 - 2” and “3 - 4”.
zip is combined with enumerate. Enumerate is also very simple. It takes
an iterator. The ith element of enumerate is (i, ith element of input
iterator).
for index, el in enumerate(['a','b']):
    print("Index {}: {}".format(index, el))
Will print “Index 0: a” and “Index 1: b”. Notice that when combining zip
with enumerate, you need to add brackets when unpacking the values. Not
using brackets would throw a ValueError (not enough values to unpack
(expected 3, got 2). The reason is that enumerate is sending a tuple of
size two.
Another way to combine test cases is to use itertools.product. Product
will yield all combinaisons possible of multiple iterables.
from itertools import product

for a, b in product([1, 2], ['a', 'b', 'c']):
    print("{} - {}".format(a, b))
will print: 1 - a 1 - b 1 - c 2 - a 2 - b 2 - c
You can use product to test all the possible combinaisons of your input
values.
from itertools import product

test_cases = [TestCase('{}_test'.format(nb),
                       path_out,
                       value1,
                       value2) for nb, (value1, value2) in enumerate(product(values1, values2))]
There is so much to say about generators, iterators.
Generalizing this approach
In this post, we learned about how to use python and jinja2 to automate
test creation. Instead of spending your precious time writing
boilerplate code, you can just focus on what you want to test.
This is a simple example, the concept of automation is very powerful and
helps tremendously in every day life. Even if your activities do not
imply coding, there must be some repetitive task that can be automize.
For example, sending the same mail to each mail address in an excel
spreadsheet. This can be automized (see pandas to read from excel file).
If you’re interested in the subject, have a look at automate the boring
stuff with Python.
26 Apr 2018
I’ve always been an avid reader of long fantasy novel series. As a kid,
I used to read Lord of the ring, Harry Potter (does it count? Yes it
does!) and basically everything I could put my hand on.
More recently I’ve been a huge fan of the work of Brandon Sanderson. For
those who don’t know, Sandersonis the epic fantasy writer. He builds
entire world in different series of books that are somewhat connected in
the grander scheme: Sanderson website
So yes, I really love epic Fantasy. But amazing book series come with a
big caveat: the Wait. As opposed to the Thrill while reading, the Wait
is the excruciable period from when I finish a book until the next one
is released. Let’s take a few example: The Stormlight Archive by
Sanderson is a novel series which contains 3 books at the moment:
- The Way of Kings, published August 31, 2010
- Words of Radiance, published March 4, 2014
- Oathbringer, published November 14, 2017
I’ve been in a state of passive suffering for at least 7 years.
Another great series of novel is The Kingkiller Chronicle by Patrick
Rothfuss. Here, the last book has been published 7 years ago!
And also, Game of Thrones people?
To be clear, I am very grateful to the authors out there that are
publishing these fantastic books. But how to satisfy the Wait? I’ve
found two ways some far:
- Read more novels. This has the benefit of making me forget a bit
about the previous book I read, but it might add more series to the
wait list.
- Read novel series that have already ended. That way no more wait.
Just a feeling of emptiness at the end.
16 Apr 2018
I’m always amazed when I watch people mastering emacs. They can do
everything so much faster and with less keystrokes. However, if you have
no experience with elisp like me, extending emacs to do what I want
seems like a daunting task.
As always, reading books and blogs about Emacs can help (ironic that I
am writing about this isn’t it), but practice beats everything when it
comes to learing a new programming language. That’s why, after doing 20
times the same operation, I decided to implement some shortcut in Elisp.
What I am trying to achieve
I am working in multiple projects at a time, both in my professional and
personal life so I need to way to create notes quickly, and organize
them so that I can find them easily. I used to use Evernote for this but
after switching everything to Emacs I prefer using Orgmode.
My custom Emacs command will prompt me for a project and a note name,
and will create a file in the correctly directory that I can edit.
Let’s dissect the problem a bit
Here I need a way to:
- Find the list of my current projects
- Get a name for the new note
- Create the file name from above
- Create the note and switch to orgmode
How to test Elips easily
Elisp is much easier when you can test commands one by one. There is a
good tutorial here on
lisp-interaction-mode. This tutorial also links the great essay by
Norvig about how to learn a programming language so I thought it was
appropriate to link it here as well.
Find all the projects
Projects here are represented as subdirectory of the projects folder.
Basically, the folders are structured as: ~/notes/projects/, so notes
for project ‘example’ would be stored under ~/notes/projects/example/.
Here comes the first function. It will fetch all the directories under
the projects folder and ask the user to choose one.
(defvar my/project-path "~/notes/projects")

(defun my/pick-project ()
  "Prompt user to pick a choice from a list."
  (let ((choices (directory-files my/project-path)))
    (message "%s" (completing-read "Open bookmark:" choices ))))
Here, directory-files will list all the files in the given directory
(one improvement would be to keep only folders). Next line will prompt
me for a choice in this list of file and will return my choice.
Get a note name
To read a string from an user, read-string is the way to go.
(defun my/choose-note-name ()
  "Prompt user to choose a note name"
  (read-string "Choose the note name: "))
This will open a mini-buffer and will display “Choose the note name: “.
It will return the user’s answer.
Concatenate everything to get the note path
I played around a bit with clojure so I was expecting concatenating a
list of strings to be as easy, but unfortunatly it is slightly more
complicated here. I am using the concatenate function that requires a
type specifier.
(concatenate 'string "string1" "string2")
In the next function, I am also using the let form which let (:’)) me
write cleaner code.
(defun my/create-note-name ()
  (let ((project-name (my/pick-project))
    (note-name (my/choose-note-name)))
    (concatenate 'string
         me/project-path
         "/"
         project-name
         "/"
         note-name
         ".org")))
The hardcoded slashes are ugly and I pretty sure there is a better way
to create the path from tokens…
Create the note
You can use find-file to create a file and edit it in the current
window. In my case, I want to open a new window to edit the note so I am
using find-file-other-window instead.
The function looks like:
(defun my/create-new-project-note ()
  (interactive)
  (let ((filename (my/create-note-name)))
    (find-file-other-window filename)
    (org-mode)))
Notice (interactive) which is there to make the function available when
typing M-x. (org-mode) is also called after switching buffer so that the
correct mode is used for editing the note.
It’s done! But…
There is a lot of things to improve:
- I’d like to be able to create a new project if it does not exist
instead of having to create a new folder myself.
- directory-files lists all files in a directory, including
non-folders and “.”, “..”. These need to be filtered out.
- Concatenating is ugly.
- After creating a note, I am using yasnippet to set the note
skeleton. There should be a way to automize that.
That first experience with Elisp was anyway encouraging as I used this
function everyday. Stay tuned for other code dissection ;)
Full code
(defvar my/project-path "~/Nextcloud/notes/projects")

(defun my/pick-project ()
  "Prompt user to pick a choice from a list."
  (let ((choices (directory-files my/project-path)))
    (message "%s" (completing-read "Open bookmark:" choices ))))

(defun my/choose-note-name ()
  "Prompt user to choose a note name"
  (read-string "Choose the note name: "))


(defun my/create-note-name ()
  (let ((project-name (my/pick-project))
    (note-name (my/choose-note-name)))
    (concatenate 'string
         me/project-path
         "/"
         project-name
         "/"
         note-name
         ".org")))

(defun my/create-new-project-note ()
  (interactive)
  (let ((filename (my/create-note-name)))
    (find-file-other-window filename)
    (org-mode)))


