02 May 2019
Object picking is a technique used to select an object in a scene from a click of the mouse.
For example, it can be used in a RTS to select a unit. It can also be used in a game engine editor
to select an object to modify.
There are several ways to do object picking. If you have an existing physics engine, you can cast
a ray from the mouse position. Unfortunately, I do not have a physics engine yet so I’ll talk about
another method, which is using the GPU.
The concept: Pixel-perfect object selection using the GPU
When rendering a scene to the screen, the GPU is already doing all the calculations necessary to
determine what color each pixel should have. Depth testing in particular will discard the fragments
that can not be visible. If you click on a pixel located a (x, y), the color of this pixel is actually
specific to a game object.
The idea of this technique is to use a unique color for each object in the scene. Then, when clicking on
a pixel, we can find what object is it by getting the pixel’s color. Of course, you don’t want to
actually render this to the screen. The pixel information will be available in a buffer but will
not be presented to the screen.
The problem with that technique is that you need to render the scene to an image a second time. However, object picking is only done when the user click on a mouse button so this performance penalty will only occur at that time.
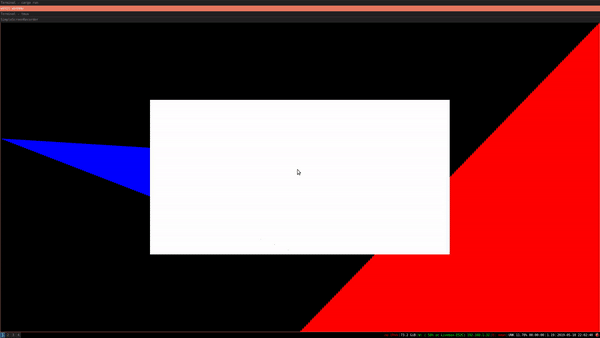
In drawing, this is your original scene with a few objects. Each object will have a unique color assigned. The rendered image will look like:
Vulkan implementation
There are already a lot of examples on the Web about opengl. This time, I will use vulkano
(Rust Vulkan library) for the implementation. The scene will contain a few 2D shapes and depth
testing is enabled so some shapes will appear in front of other shapes. This code will be based
on the triangle example. I’ll make it available on github instead of copy-pasting the code here
as I used to do because there is a lot of boilerplate :).
The shaders
The first vertex and fragment shaders are from the vulkano examples, except that I accept a
vec3 to include the depth and I want to set a different color for each shape.
#version 450
layout(location = 0) in vec3 position;
layout(location = 1) in vec3 color;

layout(location = 0) out vec3 out_color;

void main() {
    gl_Position = vec4(position, 1.0);
    out_color = color;
}
Then, each fragment will get its color from the vertex shader. A push constant will be used to indicate whether an object is selected. This is a visual way of confirming the code work instead of printing to console.
#version 450

layout(location = 0) in vec3 color;
layout(location = 0) out vec4 f_color;

layout (push_constant) uniform PushConstants {
    int isSelected;
} pushConstants;

void main() {
    if (pushConstants.isSelected == 0) {
        f_color = vec4(frag_color, 1.0);
    } else {
        f_color = vec4(1.0, 1.0, 1.0, 1.0);
    }
}
For object picking, we want to encode the object ID as a color. For example, I could have two
blue triangles. They would use the same vertex data (position and color) but they won’t have
the same object ID. Clearly, we cannot use the same shaders to implement that idea. Instead,
I will use shaders that are a bit different. They should use the same vertex data as I do not
want to duplicate the amount of data uploaded to GPU memory.
#version 450
layout(location = 0) in vec3 position;
layout(location = 1) in vec3 color;

layout(location = 0) out vec4 out_color;

// Magic happens here.
layout(push_constant) uniform PushConstants {
        vec4 color;
} pushConstants;

void main() {
    gl_Position = vec4(position, 1.0);
    out_color = uniforms.color;
}
Instead of getting the color from the vertices, I get it from a push constant. For each object, we can push different data using the push constants.
The fragment shader changes a bit as I use a vec4 now. The reason is that I want to use the value vec4(0.0, 0.0, 0.0, 0.0) as absence of object.
#version 450

layout(location = 0) in vec3 color;
layout(location = 0) out vec4 f_color;

void main() {
    f_color = color;
}
Adding depth testing to our triangle example
A few things are necessary to do to enable depth testing. In summary:
- Enable depth testing in the pipeline
- Add a depth attachment to the render pass
- Add a depth buffer to the framebuffer
- Provide clear values for drawing. In vulkan, depth ranges from 0.0 to 1.0, 1.0 being the far plane.
This link provides more information: vulkan-tutorial.
Render scene to an image
Hum, this is going to be more complicated. This process will be done independently from
the real rendering. The object picking is done only when the user click on the mouse and
does not alter what is rendered to the screen.
As we saw before, the shaders for object picking are not the same than for normal scene rendering so I will need to create a new pipeline for this.
Then, when beginning the render pass, I cannot touch the swapchain images as they are going to be presented to the screen so I need to create new
images only for object picking, where color information will be written to.
Like the triangle example, there is a lot of preparation to do before issuing the actual commands
to the GPU:
- Create the image that will contain color information;
- Create the render pass: I just need a single pass that writes to a color attachment;
- Create the pipeline with the corresponding shaders;
- Create the framebuffer that will be used in the command buffer.
That’s my image:
        // Create the image to which we are going to render to. This
        // is not a swapchain image as we do not render to screen.
        let image_usage = ImageUsage {
            transfer_source: true, // This is necessary to copy to external buffer
            .. ImageUsage::none()
        };

        let image = AttachmentImage::with_usage(
            queue.device().clone(),
            dimensions,
            Format::R8G8B8A8Unorm, // simple format for encoding the ID as a color
            image_usage).unwrap();
That’s my render pass:
        let render_pass = Arc::new(vulkano::single_pass_renderpass!(
                queue.device().clone(),
                attachments: {
                    color: {
                        load: Clear,
                        store: Store,
                        format: Format::R8G8B8A8Unorm,
                        samples: 1,
                    },
                    depth: {
                        load: Clear,
                        store: DontCare,
                        format: Format::D16Unorm,
                        samples: 1,
                    }
                },
                pass: {
                    color: [color],
                    depth_stencil: {depth}
                }
        ).unwrap());
That’s my pipeline:
        let vs = pick_vs::Shader::load(queue.device().clone()).unwrap();
        let fs = pick_fs::Shader::load(queue.device().clone()).unwrap();
        let pipeline = Arc::new(GraphicsPipeline::start()
                                .vertex_input_single_buffer::<Vertex>()
                                .vertex_shader(vs.main_entry_point(), ())
                                .triangle_list()
                                .viewports_dynamic_scissors_irrelevant(1)
                                .depth_stencil_simple_depth()
                                .viewports(iter::once(Viewport {
                                    origin: [0.0, 0.0],
                                    dimensions: [dimensions[0] as f32, dimensions[1] as f32],
                                    depth_range: 0.0 .. 1.0,
                                }))
                                .fragment_shader(fs.main_entry_point(), ())
                                .render_pass(Subpass::from(render_pass.clone(), 0).unwrap())
                                .build(queue.device().clone())
                                .unwrap());
And this is my framebuffer:
        let depth_buffer = AttachmentImage::transient(
            queue.device().clone(),
            dimensions,
            Format::D16Unorm).unwrap();

       // Use our custom image in the framebuffer.
        let framebuffer = Arc::new(Framebuffer::start(render_pass.clone())
                                   .add(image.clone()).unwrap()
                                   .add(depth_buffer.clone()).unwrap()
                                   .build().unwrap());
Nothing too fancy here!
Then, when triggering the object picking functionality:
- Create a new command buffer builder;
- Start a new render pass with the previous framebuffer;
- for each game object, encode the ID as push constants;
- Create a draw call for the game object using the previous push constants;
- Finish render pass and execute the command buffer.
I also need to wait for the GPU to finish the operation before reading from the image.
ID encoding
For this code, I used a simple color encoding. Opaque colors are objects. Transparent colors
mean no object. Then the ID is converted to RGB with the following pseudo-code.
r = (id & 0xFF) / 255
g = ((id >> 8) & 0xFF) / 255
b = ((id >> 16) & 0xFF) / 255
The division by 255 is to get a value between 0 and 1. The ID can be retrieved from a color by
inverting these equations. By the way, choosing the good format for the image is important here.
We chose R8G8B8A8… so that the bytes we get in the buffer will actually correspond to 8-bit RGB.
How to transfer back to a CPU accessible buffer
The image I created now holds the color information. Unfortunately I cannot access
it directly. I need to transfer it to a CPU accessible buffer first. This is done
in two steps: first, create the buffer which has the same size than the image, then
issue a command to copy from the image to the buffer.
        // That is the CPU accessible buffer to which we'll transfer the image content
        // so that we can read the data. It should be as large as 4 the number of pixels (because we
        // store rgba value, so 4 time u8)
        let buf = CpuAccessibleBuffer::from_iter(
            queue.device().clone(), BufferUsage::all(),
            (0 .. dimensions[0] * dimensions[1] * 4).map(|_| 0u8)).expect("Failed to create buffer");

        // .... A bit after having issued draw commands
        command_buffer_builder = command_buffer_builder
            .copy_image_to_buffer(self.image.clone(), self.buf.clone())
            .unwrap();

        let command_buffer = command_buffer_builder.build().unwrap();

        // Execute command buffer and wait for it to finish.
        command_buffer
            .execute(self.queue.clone())
            .unwrap()
            .then_signal_fence_and_flush()
            .unwrap()
            .wait(None)
            .unwrap();
The vulkano guide shows how to do it: vulkano guide.
Also there!
The image with the objects’ID has been transferred to a buffer, so the last step is to get back the entity from the position of the mouse. Winit provides events to detect mouse click and mouse position change so I won’t talk in details about that.
Let’s say we have x and y from Winit. These are in logical coordinates, so first, they need to be converted to physical coordinates by multiplying by the hidpi factor.
let x = mouse_x * surface.window().get_hidpi_factor();
Then, be mindful that the pixel information is stored as R8G8B8A8 in the buffer. For each pixels, there are four u8 values (Red, Green, Blue and A for transparency). That gives us the index: 4 * (line * width) + column. Mouse’s y position is the line, and mouse’s x position is the column.
Then, by inverting the encoding of before, we get the selected entity.
    fn get_entity_id(r: u8, g: u8, b: u8, a: u8) -> Option<usize> {
        if a == 0 {
            None
        } else {
            Some((r as usize) | (g as usize) << 8 | (b as usize) << 16)
        }
    }
Finally!
This was an easy way of doing object picking using the GPU. It’s not particularly performant as the scene is drawn again. It is also not part of the main rendering pipeline as this is an on-demand feature. For a small number of object, the current implementation does the trick.
The code is available on my github so feel free to use it as it is.
15 Apr 2019
I’ve always wanted to create a multiplayer game so networking code has been implemented from very early in the engine development. The requirements are very specific to the FPS arena style:
- low latency
- few players
- avoid common hacks
After reading a bunch, I decided to implement the application protocol over UDP, heavily inspired by the Quake network code. Just to summarize very quickly:
- One server that hold the true state of the game
- One client per player
- At first, the whole game state is sent to the players
- Once it has been acknowledged that a player has received the game state, only the change in game state is sent afterwards
For example, at first a player will receive all the game objects, including static objects such as trees and lights. During the game however, she will receive only the changes, such as the new position of another player. This allows to reduce a lot the size of the
data sent.
Serde library has been a blessing for packing the data. Tokio library has been an headache to get started with but it looks like it
is working nicely now and only the lowest layer of the game engine network code is using Tokio.
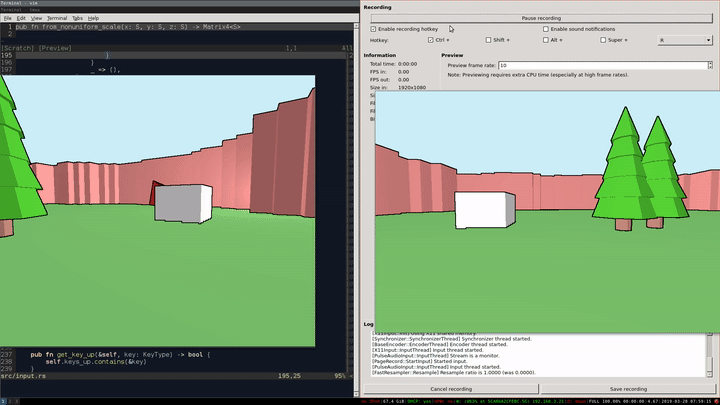
This is the result for now:
This is UDP so messages that are sent are not necessarily received. The client side is always sending messages, including the
player command such as move or shoot. These can be lost. My next step in that area would be to add some reliable message sending
for use case such as chat messages.
Cheers~
14 Mar 2019
Hello world!
I’ve been meaning to write more here but a new project was taking all my free time. Now that it
looks a bit more presentable, I’ll try to give more updates here! I like games, I like programming
and I like Rust, so what’s more nature than coding my own game engine :).
But there are a lot of game engines already!
Yea well, … that is life.
Seriously, why?
It all started because I wanted to learn 3D graphics. There are a couple of crates that interface
with the graphic API with Rust, for example glium, gfx-hal and vulkano. I started with the latter
because Vulkan is lower level than OpenGL and is also used in a lot of other languages. Hal looks
great and is heavily inspired by the Vulkan API so I might switch later if cross-platform is too
much of a concern.
Anyway, from a simple triangle example, it evolved to a simple 3D game engine with a game editor.
A game in mind
Instead of mindlessly coding some random 3D stuff, a friend joined me and we are going to develop
a game at the same time as the engine. The game will be a multiplayer FPS, Arena style with cel
shading style graphics. Let’s do this!
In the coming weeks I might add more content:
- How the rendering engine is working under the hood
- How the networking works
- yada yada
20 Feb 2019
I often use TCP for communication within a network of systems. Let’s just use the example
of a online game. The client, that is the game that is running on your own machine, needs
to get the latest game update from the server, which is located on my environment. The
client also needs to send updates to the server. For example, if your character moves and shoots,
this information need to be forwarded to the server.
Here, I won’t talk about problematics such as who holds the true state between the server and client.
I will just show an easy way to send messages across the network.
I’ll show how to solve common problems that are encountered when sending data across the network:
- How to abstract away the exchange of bytes:
TCP allows two hosts to exchange stream of bytes. When reading from a TCP socket, you might not
receive at once enough data to recreate the original logical message, so you need to accumulate
the received bytes in a buffer until there are enough to unpack your message.
- How to send different messages with different fields across the network.
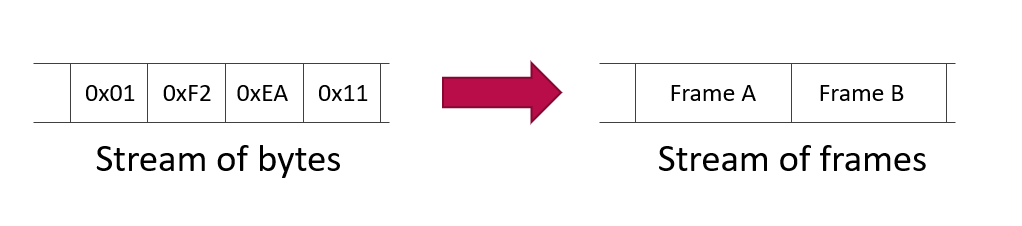
From a stream of bytes to a stream of frames
Accumulating and decoding messages from a buffer is not fun. I’d rather receive a complete message
or nothing whenever I read from a socket. To do so, you need to add some structure to the stream
of bytes. For example, you can decide that each message is finished with CRLF. Then, you read bytes until
you find ‘\r\n’ and here you are, one complete message. This is called message framing.
Basics with Tokio
I’ll use the Tokio crate for creating the server and client of my application. ‘Tokio’ introduces
very quickly the concept of framing in its example. See the following stripped down example, from chat.rs.
impl Stream for Lines {
    type Item = BytesMut;
    type Error = io::Error;


    fn poll(&mut self) -> Poll<Option<Self::Item>, Self::Error> {

        // First, read any new data that might have been received off the socket
        let sock_closed = self.fill_read_buf()?.is_ready();

        // Now, try finding lines
        let pos = self.rd.windows(2).enumerate()
            .find(|&(_, bytes)| bytes == b"\r\n")
            .map(|(i, _)| i);

        if let Some(pos) = pos {
            // Remove the line from the read buffer and set it to `line`.
            let mut line = self.rd.split_to(pos + 2);

            // Drop the trailing \r\n
            line.split_off(pos);

            // Return the line
            return Ok(Async::Ready(Some(line)));
        }

        if sock_closed {
            Ok(Async::Ready(None))
        } else {
            Ok(Async::NotReady)
        }
    }
}
This is what happens:
- Data available on the socket is added to an internal buffer
rd in self.fill_read_buff.
- If there is
\r\n in the buffer, split it and return the data before.
- If not, tell the rest of the code that no data is available yet.
Lines is wrapping a TcpStream. Instead of polling the TCP socket directly, the chat application
is polling the Lines stream that will internally get the data from the socket.
while let Async::Ready(line) = self.lines.poll()? {
    println!("Received line ({:?}) : {:?}", self.name, line);
}
Splitting messages per line is super basic but has several pitfalls. The size of the message is unknown
until you reach CRLF so you cannot allocate memory upfront for the message. If the separator is present
in the message data, then you split the message in two parts or more. Bernstein proposed an encoding
of a string that is very easy to parse and generate: netstring. I will use it
in the rest of this post.
Writing a netstring code with Tokio
Implementing Stream worked great to decode incoming data, but it does not handle sending the same
kind of data to the other party. To do so, Tokio provides the Framed structure, that wraps
a socket and provides a stream to read from, and a sink to send data to. All the Framed structure
needs is a stream of bytes and a way (a codec) to encode/decode bytes to your choice of encoding. In the online
documentation, the example is using new lines as encoding.
The codec needs to implement the Encoder and Decoder traits. Encoding a netstring from a string is easy:
/// Netstring is an easy way to frame data on TCP.
/// http://cr.yp.to/proto/netstrings.txt
pub struct NetstringCodec {
    state: ParserState,

    current_length: usize,

    /// Max length for the string. This is to avoid attacks by sending
    /// packets that are too large.
    max_length: usize,

    /// Will disconnect the peer on error if this is true.
    disconnect_on_error: bool,
}

impl Encoder for NetstringCodec {

    type Item = Vec<u8>;
    type Error = io::Error;

    fn encode(&mut self, item: Vec<u8>, dst: &mut BytesMut) -> io::Result<()> {

        let item_len = item.len().to_string();
        if item.len() >= self.max_length {
            return Err(io::Error(io::ErrorKind::InvalidData,
                                 format!("data is too large ({}) to send. max length: {}",
                                         item_len, self.max_length)));
        }

        let len_string = item_len.as_bytes();
        dst.extend_from_slice(len_string);
        dst.extend_from_slice(":".to_string().as_bytes());
        dst.extend_from_slice(&item[..]);
        dst.extend_from_slice(",".to_string().as_bytes());

        Ok(())
    }
}
By the way, I am using a vector of u8 here. That represents the message I want to send. It
will make more sense later ;). The encoder will get the message (item in the signature) and will add it to the buffer dst.
Decoding needs a bit more work. Basically the parser which will yield an item from a buffer
of bytes can be in two states. Either it is reading the length of the netstring, or it is reading the body, including the final comma. I represent those states with an enumeration:
#[derive(Debug, PartialEq)]
enum ParserState {
    Length,
    Data,
}
Then, if the parser is in the Length state, it should be looking for a colon, which indicates
that we have received the length of the string. In the Data state, the parser will read
length+1 bytes from the incoming buffer. It will make sure that the last byte received is a comma and then it will return the whole message.
impl Decoder for NetstringCodec {
    type Item = Vec<u8>;
    type Error = io::Error;

    fn decode(&mut self, buf: &mut BytesMut) -> Result<Option<Vec<u8>>, io::Error> {
        self.parse_length(buf)
    }
}

impl NetstringCodec {
    fn parse_length(&mut self, buf: &mut BytesMut) -> Result<Option<Vec<u8>>, io::Error> {

        // Try to find the current length.
        if self.state == ParserState::Length {


            if let Some(colon_offset) = buf.iter().position(|b| *b == b':') {
                // try to extract the length here.
                let length = buf.split_to(colon_offset+1);
                let length = &length[..length.len()-1]; // remove colon from length
                //TODO better - leading 0 should not be ok
                self.current_length = str::from_utf8(&length).unwrap().parse().unwrap();

                if self.current_length > self.max_length {
                    return Err(io::Error::new(
                            io::ErrorKind::InvalidData,
                            format!("Packet length ({}) is larger than max_length {}.",
                            self.current_length,
                            self.max_length)));
                }

                self.state = ParserState::Data;
            } else {

                // If len is 9 and we are still trying to parse the length, give up now.
                // I absolutely don't want 99999999 sized packets.
                if buf.len() >= 9 {
                    return Err(io::Error::new(io::ErrorKind::InvalidData, "Data length part is bigger than 8."));
                }
                return Ok(None);
            }
        }

        // In case we have already read the size of the data.
        if self.state == ParserState::Data {
            return self.parse_data(buf);
        }

        Ok(None)
    }

    fn parse_data(&mut self, buf: &mut BytesMut) -> Result<Option<Vec<u8>>, io::Error> {

        if buf.len() >= self.current_length+1 {

            let data = buf.split_to(self.current_length+1);

            if data[data.len()-1] != b',' {
                // There's a bug in the matrix.
                return Err(io::Error::new(io::ErrorKind::InvalidData, "End delimiter of data should be a comma"));
            }

            // last char should be a comma.
            let data = &data[..data.len() - 1];

            self.state = ParserState::Length;
            self.current_length = 0;

            return Ok(Some(data.to_vec()));
        }

        Ok(None)
    }
}
Whenever I return Ok(None), it means that no data is available yet. This codec, along with
Framed, is used to receive and send Vec<u8> in one message. The code for the server is:
fn main() -> Result<(), Box<std::error::Error>> {
    let addr = "127.0.0.1:6142".parse()?;
    let listener = TcpListener::bind(&addr)?;
    let server = listener.incoming().for_each(move |socket| {
        process(socket);
        Ok(())
    })
    .map_err(|err| {
        println!("accept error = {:?}", err);
    });

    println!("Running on localhost:6142");
    tokio::run(server);

    Ok(())
}


// Spawn a task to manage the socket.
fn process(socket: TcpStream) {
    // transform our stream of bytes to stream of frames.
    // This is where the magic happens
    let framed_sock = Framed::new(socket, NetstringCodec::new(123, true));

    let connection = Peer::new(framed_sock).map_err(|e| {
            println!("connection error = {:?}", e);
        });
    // spawn the task. Internally, this submits the task to a thread pool
    tokio::spawn(connection);
}

// Struct for each connected clients.
struct Peer {
    socket: Framed<TcpStream, codec::NetstringCodec>,
}

impl Peer {
    fn new(socket: Framed<TcpStream, codec::NetstringCodec>) -> Peer {
        Peer {
            socket,
        }
    }
}

impl Future for Peer {
    type Item = ();
    type Error = io::Error;

    fn poll(&mut self) -> Poll<(), io::Error> {
        while let Async::Ready(line) = self.socket.poll()? {
            match line {
                Some(d) => {
                    dbg!(d);
                },
                // eol/something bad happend in decoding -> disconnect.
                None => return Ok(Async::Ready(())),
            }
        }

        Ok(Async::NotReady)
    }
}
The interesting bits are:
Framed::new(...) will transform the TcpStream to a stream of netstrings.- The type for the Framed structure is
Framed<TcpStream, NetstringCodec>
- The framed socket is used the same way as a raw TCP socket.
The following code can be used as a client:
use codec;
use std::env;
use std::io::{self, Read, Write};
use std::net::SocketAddr;
use std::thread;

use tokio::prelude::*;
use futures::sync::mpsc;

fn main() -> Result<(), Box<std::error::Error>> {
    let mut args = env::args();
    // Parse what address we're going to connect to
    let addr = match args.nth(1) {
        Some(addr) => addr,
        None => Err("this program requires at least one argument")?,
    };

    let addr = addr.parse::<SocketAddr>()?;
    let (stdin_tx, stdin_rx) = mpsc::channel(0);

    thread::spawn(|| read_stdin(stdin_tx));
    let stdin_rx = stdin_rx.map_err(|_| panic!("errors not possible on rx"));

    let stdout = tcp::connect(&addr, Box::new(stdin_rx))?;
    let mut out = io::stdout();

    tokio::run({
        stdout
            .for_each(move |chunk| {
                out.write_all(&chunk)
            })
        .map_err(|e| println!("error reading stdout; error = {:?}", e))
    });

    Ok(())
}


mod tcp {

    use tokio;
    use tokio::net::TcpStream;
    use tokio::prelude::*;
    use tokio::codec::{Framed, Decoder};

    use bytes::BytesMut;
    use std::error::Error;
    use std::io;
    use std::net::SocketAddr;

    pub fn connect(addr: &SocketAddr,
                   stdin: Box<Stream<Item = Vec<u8>, Error = io::Error> + Send>)
        -> Result<Box<Stream<Item = Vec<u8>, Error = io::Error> + Send>, Box<Error>>
        {

            let tcp = TcpStream::connect(addr);

            let stream = Box::new(tcp.map(move |stream| {
                // magiiic
                let (sink, stream) = Framed::new(stream, tw::codec::NetstringCodec::new(255, true)).split();

                tokio::spawn(stdin.forward(sink).then(|result| {
                    if let Err(e) = result {
                        println!("failed to write to socket: {}", e)
                    }
                    Ok(())
                }));

                stream
            }).flatten_stream());

            Ok(stream)
        }

}

fn read_stdin(mut tx: mpsc::Sender<Vec<u8>>) {
    let mut stdin = io::stdin();


    loop {
        let buf: Vec<u8> = vec![2, 14, 42];
        tx = match tx.send(buf).wait() {
            Ok(tx) => tx,
            Err(_) => break,
        };

        thread::sleep(std::time::Duration::from_secs(1));
    }
}
This code is based on the example from tokio connect.rs. The Framed socket is split into the stream and the sink.
Well that’s great. I have a client and a server that can exchange vectors of u8 and I don’t have to manage buffering data from the TCP socket anymore. Next step is to send data that actually mean anything instead of a sequence of bytes. To do so, I will use serde and MessagePack to serialize a Rust Struct into a vector of u8.
Serializing/Deserializing the messages
Serde is a crate to serialize and deserialize Rust objects to a defined format. MessagePack is one of those formats and is binary, i.e. we can convert a Rust object to a vector of bytes.
Now you can see the bigger picture:
- The socket receives a netstring.
- It will extract a sequence of bytes from this netstring
- Serde will then deserialize the sequence of bytes to a proper Rust structure

On the other side:
- Serde serialize a Rust structure to a vector of bytes.
- This vector of bytes is then encoded to a netstring.
- Which in turn is sent to the other party via the socket.

The simplest message
A very basic example is:
use serde_derive::{Serialize, Deserialize};
use rmp_serde::Serializer;
use serde::{Serialize, Deserialize};

#[derive(Serialize, Deserialize, Debug)]
pub struct Message {
        x: f32,
        msg: String,
}

impl Message {
        pub fn pack(&self) -> Vec<u8> {
                let mut buf = Vec::new();
                self.serialize(&mut Serializer::new(&mut buf)).unwrap()
                buf
        }

        pub fn unpack(buf: Vec<u8>) -> Result<Self, rmp_serde::decode::error> {
                rmp_serde::from_slice::Message>(&buf).unwrap()
        }
}
In the server example, you can use this code to get a message structure from a socket.
impl Future for Peer {
    type Item = ();
    type Error = io::Error;

    fn poll(&mut self) -> Poll<(), io::Error> {
        while let Async::Ready(line) = self.socket.poll()? {
            match line {
                Some(d) => {
                    let msg = Message::unpack(d); // This is a Result
                    dbg!(d);
                },
                // eol/something bad happend in decoding -> disconnect.
                None => return Ok(Async::Ready(())),
            }
        }

        Ok(Async::NotReady)
    }
}
Just one line is necessary. The code for the client is straightforward as well so I won’t
paste it here. Just call message.pack() to get the Vec<u8> that can be sent with the
framed socket.
I want different message types!
In reality, using only a struct like that for a message will not be very useful. What if you
want to send position of player in one message, and some action in another message (like “Shoot”).
Clearly, the previous implementation will not be enough. You might add a lot of fields for different
purposes but the structure will become very big after some time.
Fortunately, serde allows use to serialize and deserialize enumeration. We can use that fact to
have a lot of different small messages. First, you need to create a small structure for each
message type. For example:
#[derive(Debug, Serialize, Deserialize)]
struct MoveMessage {
        x: f32,
        y: f32,
        z: f32,
}

#[derive(Debug, Serialize, Deserialize)]
struct ShootMessage;
Then, create an enumeration.
#[derive(Debug, Serialize, Deserialize)]
enum Message {
        Move(MoveMessage),
        Shoot(ShootMessage),
}

impl Message {
        // Same as before
        }
And… that is all is needed to send multiple kind of messages on the wire!
07 Feb 2019
The people at AWS made a great job with their serverless tutorial.
The lambda code is using Node but I’d rather use Python instead. At first,
it looks like converting the code would be trivial but we hit one of the small
problems that makes serverless complex.
Lambda proxy integration with API Gateway
In the API gateway integration, there is an option to forward all input context
(HTTP message but also some AWS specific data) to the Lambda function. In this particular
example, the information of the user that made the HTTP request is forwarded. All this
data should be available in the event parameter of the Lambda handler.
exports.handler = (event, context, callback) => {
    if (!event.requestContext.authorizer) {
      errorResponse('Authorization not configured', context.awsRequestId, callback);
      return;
    }

    const rideId = toUrlString(randomBytes(16));
    console.log('Received event (', rideId, '): ', event);

    // Because we're using a Cognito User Pools authorizer, all of the claims
    // included in the authentication token are provided in the request context.
    // This includes the username as well as other attributes.
    const username = event.requestContext.authorizer.claims['cognito:username'];

    // ...
The event.requestContext.authorizer will contain all the authentication information.
That can be useful for example to insert data in a user-specific table in DynamoDB.
Difference of implementation between languages
If using Python, the logical thing to do would be to use event['requestContext']['authorizer'].
Unfortunately, you will be rewarded with a KeyError if you use that code (as of Feb 2019).
The Python API does not expose the authorizer yet.
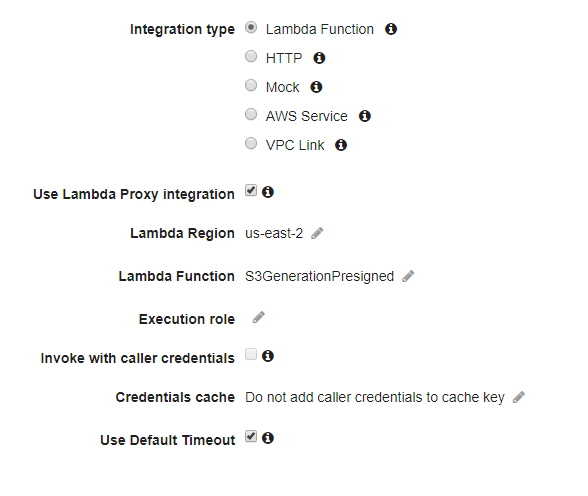
One solution to this problem is to throw away the Lambda proxy integration and use
mapping templates instead. Mapping templates will map the API Gateway request to the
Lambda request.
To configure this, you need to change the integration request of your API Gateway method.
First, untick the Use Lambda proxy integration box, then, in Mapping Templates, add
a new mapping template for application/json (or whatever data format you receive).
I took the default templates (passthrough) and added some extra fields.
##  See http://docs.aws.amazon.com/apigateway/latest/developerguide/api-gateway-mapping-template-reference.html
##  This template will pass through all parameters including path, querystring, header, stage variables, and context through to the integration endpoint via the body/payload
#set($allParams = $input.params())

{
"body-json" : $input.json('$'),

"params" : {
#foreach($type in $allParams.keySet())
    #set($params = $allParams.get($type))
"$type" : {
    #foreach($paramName in $params.keySet())
    "$paramName" : "$util.escapeJavaScript($params.get($paramName))"
        #if($foreach.hasNext),#end
    #end
}
    #if($foreach.hasNext),#end
#end
},

"stage-variables" : {
#foreach($key in $stageVariables.keySet())
"$key" : "$util.escapeJavaScript($stageVariables.get($key))"
    #if($foreach.hasNext),#end
#end
},

"context" : {
    "identity" : {
        "sub" : "$context.authorizer.claims.sub",
        "email" : "$context.authorizer.claims.email"
    },
    "account-id" : "$context.identity.accountId",
    "api-id" : "$context.apiId",
    "api-key" : "$context.identity.apiKey",
    "authorizer-principal-id" : "$context.authorizer.principalId",
    "caller" : "$context.identity.caller",
    "cognito-authentication-provider" : "$context.identity.cognitoAuthenticationProvider",
    "cognito-authentication-type" : "$context.identity.cognitoAuthenticationType",
    "cognito-identity-id" : "$context.identity.cognitoIdentityId",
    "cognito-identity-pool-id" : "$context.identity.cognitoIdentityPoolId",
    "http-method" : "$context.httpMethod",
    "stage" : "$context.stage",
    "source-ip" : "$context.identity.sourceIp",
    "user" : "$context.identity.user",
    "user-agent" : "$context.identity.userAgent",
    "user-arn" : "$context.identity.userArn",
    "request-id" : "$context.requestId",
    "resource-id" : "$context.resourceId",
    "resource-path" : "$context.resourcePath"
    }
}
The authorizer data is mapped to the context.identity. In the Lambda, I can now access my user
info with event['context']['identity']['email'] for example.
Anyway, I am considering whether using Lambda Proxy integration is a good idea. I’d rather know exactly
what is in my event object, and mapping templates give me that control.
serverless is a relatively new buzzword but it actually looks like I can deploy applications for almost
no cost as long as I don’t have any users :D. Stay tuned for maybe other AWS adventures!