Ethereum Virtual Machine in Rust - Part 5: How to execute a smart contract with Rocket (2/2)
12 Dec 2018- Ethereum virtual machine in Rust - Part 1: Introduction
- Ethereum virtual machine in Rust - Part 2: The stack
- Ethereum virtual machine in Rust - Part 3: Loops and Pure functions
- Ethereum virtual machine in Rust - Part 4: After the stack, the memory
- Ethereum virtual machine in Rust - Part 5: Executing a real smart contract
- Ethereum virtual machine in Rust - Part 5-Bis: Executing a real smart contract with Rocket
I didn’t get to code a lot while writing the previous article so let’s fix that now! Here I will create a simple EVM that can receive message from an HTTP POST request. The smart contract will be written in assembly code (and very simple obviously).
With Rust, I will have to:
- Create a small HTTP server that can accept POST requests with JSON data
- Execute the smart contract with the input parameters contained in the JSON data
- Return the result to the client that sent the HTTP request
In Assembly, I will create the following contract:
addaccepts two integers and add them togethersquareaccepts one integer and return its square
Crafting the smart contract
According to the previous post, a smart contract is structured the following way:
- Validation step: Ensure the input data contains at least the method ID
- Routing step: bunch of IFs to jump to the correct method
- Extracting input data: put the method arguments on the stack
- Execute the method
- Add return value on top of the stack
We haven’t seen how the EVM is handling return values so for now I’ll assume we can get return values from the stack.
The add and square methods
Here we’ll implement the business logic and the parameters extraction from the input data. We’ll also be careful to not keep useless values on the stack. The code will most likely look a bit different than the one produced by solc. Remember: I used the non-optimized mode to easily follow the assembly code.
First of all, add takes two input parameters (integer). We saw before that uint is encoded as 32 bytes value in the input byte array. We can just fetch 32-bytes values at indexes 0x04 and 0x24. Then, adding two values on the stack is a simple opcode ADD.
PUSH1 0x4
CALLDATALOAD
PUSH1 0x24
CALLDATALOAD
ADD
STOP
square is similar, except that we have only one input parameter that we need to duplicate and multiple with itself.
PUSH1 0x4
CALLDATALOAD
DUP1
MUL
STOP
The STOP instruction will just tell the VM to stop the execution as we reached the end of the method. These two piece of codes will be respectively labeled add and square. I’ll replace manually the label by the real location when writing the final version of the code.
Routing to the correct method
Routing is done by comparing the 4 first bytes of the input data to the method ID of add and square. Method IDS are generated
by the compiler using the Keccak hash, but to make it simpler I’ll just say that add corresponds to 0x01 and square corresponds to 0x02.
Combination of EQ and JUMPI takes care of the routing.
PUSH1 0
CALLDATALOAD
PUSH29 10000000000000000000000000000
DIV
DUP1
PUSH1 0x01
EQ
PUSH add
JUMPI
PUSH1 0x02
EQ
PUSH square
JUMPI
PUSH error
JUMP
Here we use the same trick as solc. Divide by (1 « 29) to get the 4 first bytes from the 32 bytes number. If no method ID is matched, we will jump to the error block.
Validation and error handling
Error handling will halt the execution, using the REVERT opcode.
Before running the routing code, we also need to check whether the input size if at least 4 bytes. This can be done with
CALLDATASIZE
PUSH 0x4
LT
ISZERO
PUSH error
JUMPI
PUSH routing
JUMP
All in all
At the end, the assembly code is quite small. First, start by writing the size check. Then, add the routing part and the method’s implementation. Finish by adding the error handling code. JUMPDEST should not be forgotten. It will indicate that an instruction is the destination of a JUMP instruction. By the way, this smart contract is not using the memory so the free-pointer address is not set. Now, we can write this as a hexadecimal string the same way solc would compile our solidity code. I replaced the labels by the correct addresses here.
0x00    0x36    CALLDATASIZE
0x01    0x60    PUSH1 0x04
0x02    0x04
0x03    0x10    LT
0x04    0x15    ISZERO
0x05    0x60    PUSH1 error
0x06    0x4A
0x07    0x57    JUMPI
0x08    0x60    PUSH 0x00
0x09    0x00
0x0A    0x35    CALLDATALOAD
0x0B    0x7C    PUSH29 10000000000000000000000000000
0x0C    0x01
0x0D    0x00
0x0E    0x00
0x0F    0x00
0x10    0x00
0x11    0x00
0x12    0x00
0x13    0x00
0x14    0x00
0x15    0x00
0x16    0x00
0x17    0x00
0x18    0x00
0x19    0x00
0x1A    0x00
0x1B    0x00
0x1C    0x00
0x1D    0x00
0x1E    0x00
0x1F    0x00
0x20    0x00
0x21    0x00
0x22    0x00
0x23    0x00
0x24    0x00
0x25    0x00
0x26    0x00
0x27    0x00
0x28    0x00
0x29    0x90    SWAP1
0x2A    0x04    DIV
0x2B    0x80    DUP1
0x2C    0x60    PUSH 0x01
0x2D    0x01
0x2E    0x14    EQ
0x2F    0x60    PUSH1 add
0x30    0x3A
0x31    0x57    JUMPI
0x32    0x60    PUSH1 0x02
0x33    0x02
0x34    0x14    EQ
0x35    0x60    PUSH1 square
0x36    0x43
0x37    0x57    JUMPI
0x38    0x60    PUSH1 error
0x39    0x4A
0x3A    0x5b    JUMPDEST
0x3B    0x60    PUSH1 0x04
0x3C    0x04
0x3D    0x35    CALLDATALOAD
0x3E    0x60    PUSH1 0x24
0x3F    0x24
0x40    0x35    CALLDATALOAD
0x41    0x01    ADD
0x42    0x00    STOP
0x43    0x5b    JUMPDEST
0x44    0x60    PUSH1 0x04
0x45    0x04
0x46    0x35    CALLDATALOAD
0x47    0x80    DUP1
0x48    0x02    MUL
0x49    0x00    STOP
0x4A    0x5b    JUMPDEST
0x4B    0xfd    REVERT
Writing everything by hand is very error prone, no wonder high-level programming languages have been created :D
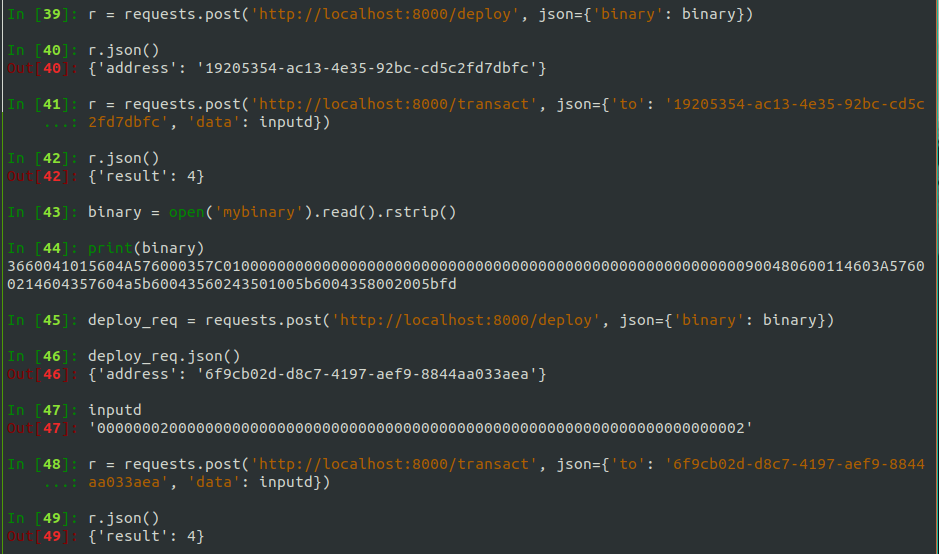
Final assembly as hexadecimal string: “0x3660041015604A576000357C0100000000000000000000000000000000000000000000000000000000900480600114603A57600214604357604a5b60043560243501005b6004358002005bfd”
We can try this without the HTTP interface using the existing code. Use this as input parameter and run the binary. It should finish with 0x04 at the top of the stack.
    let input_data = params::InputParameters::new(
        vec![0, 0, 0, 2, 0, 0, 0, 0, 0, 0, 0, 0, 0, 0, 0, 0, 0, 0, 0, 0, 0, 0, 0, 0, 0, 0, 0, 0, 0, 0, 0, 0, 0, 0, 0, 2]);
JSON interface
In real life, the user does not interact directly with the EVM. The EVM is integrated inside the ethereum client and its API is not exposed to the user. Instead, Ethereum defines a JSON-RPC API, which can be found here in the Ethereum wiki. This API exposes a lot of functions, but the one we are interested in is how to send a transaction to a smart contract, which will be executed by the EVM.
eth_sendTransaction is the one we want.
Creates new message call transaction or a contract creation, if the data field contains code.
And it accepts the following JSON file as input. Notice that the hexadecimal strings under data is actually our EVM’s input parameters packed in a byte array. to is the address of the smart contract.
params: [{
  "from": "0xb60e8dd61c5d32be8058bb8eb970870f07233155",
  "to": "0xd46e8dd67c5d32be8058bb8eb970870f07244567",
  "gas": "0x76c0",
  "gasPrice": "0x9184e72a000",
  "value": "0x9184e72a",
  "data": "0xd46e8dd67c5d32be8d46e8dd67c5d32be8058bb8eb970870f072445675058bb8eb970870f072445675"
}]
In this article, I will not use JSON-RPC to expose an API to users. Instead, I will create a simple HTTP server that will accept POST requests, extract the parameters from the body in JSON format, execute the smart contract with the given input and send back the output.
Introducing Rocket, “A Web Framework for Rust”
Rocket is a web framework developed with ease-of-use in mind. I don’t want to dwell too much on the details here as it is an article about Ethereum, so you can find more details here. Please note that Rocket is using Rust Nightly so you have to use the nightly compiler for your project (just run rustup override set nightly in your cargo directory).
First of all, let’s create a structure to represent the input data we expect from our users.
#![feature(proc_macro_hygiene, decl_macro)]
#[macro_use] extern crate rocket;
#[macro_use] extern crate rocket_contrib;
#[macro_use] extern crate serde_derive;

use rocket::State;
use rocket_contrib::json::{Json, JsonValue};
mod evm;
mod params;
use std::io;
use evm::vm::Vm;
use evm::opcode::Opcode;
use std::error::Error;
use std::env;


#[derive(Serialize, Deserialize)]
struct TransactionInput {
    // Address of the smart contract
    to: String,

    // Input data for the smart contract
    data: String,
}
The function transact will be called if a user sends a POST request with a JSON body representing TransactionInput. Then main will start Rocket. Routes are not automatically registered so you should not forget to add any additional routes using the routes! macro.
#[post("/transact", format = "json", data = "<message>")]
fn transact(message: Json<TransactionInput>) -> JsonValue {
json!({ "status": "ok" })
}
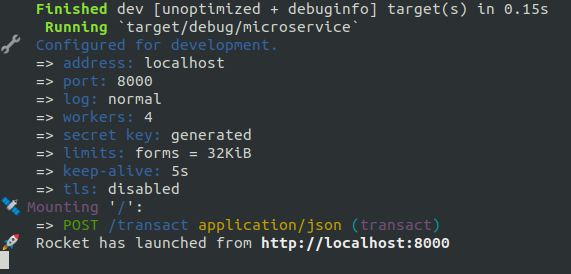
fn main() {
rocket::ignite().mount("/", routes![transact]).launch();
}
Now, you can compile and run the project. You can use curl, python and whatever HTTP client to test the API. In my case, I just use python with requests.
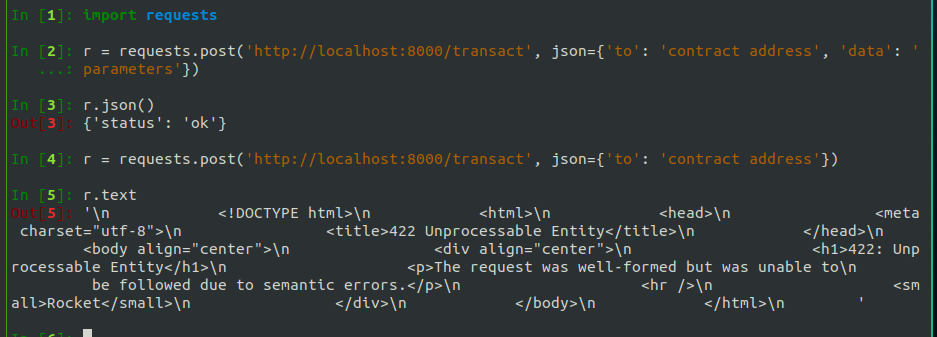
Rocket is nice with us and will validate the request coming from from the user. Now that we have a functioning endpoint, we can implement the transact function. For each request, we instantiate a new VM and pass it the input parameters. Then we run the code until completion and return the result to the user. I will also add another endpoint to get a smart contract from a POST request and deploy it to the blockchain.
Storing smart contracts in Rocket’s managed state
The server can maintain state by using the rocket’s managed state. Note that Rocket is multithreaded so the state must be thread safe. In this case, an user can deploy a smart contract and another user can execute a transaction simultaneously, so the structure that hold smart contracts should be thread-safe.
struct CodeRepo {
    contracts: std::sync::Mutex<HashMap<String, Vec<u8>>>
}
The hashmap will match contract addresses (string) to bytecode. It is stored in a mutex to ensure the thread safeness. I only store the contracts as Vec<u8>. In reality, Ethereum has a set data structure for accounts (personal or contract). Contract accounts include a persistent state that can be accessed from the EVM code. Maybe I’ll add this functionality to the code later.
Then, the state can be added to Rocket before launch.
    rocket::ignite()
        .manage(CodeRepo { contracts: std::sync::Mutex::new(HashMap::new()) })
        .mount("/", routes![transact]).launch();
To deploy a smart contract, we will just get the hexadecimal string from the user request, generate an unique String ID and add it to the managed state. Then, when a user needs to execute the smart contract, he will have to provide this unique ID and the input parameters. Like before, we need to define a new structure to represent the deploy message. Similarly to transact, a deploy endpoint should be added. It will just decode the hexadecimal string to a vector of bytes and store it inside the managed state.
#[derive(Serialize, Deserialize)]
struct DeployInput {
    binary: String,
}

#[post("/deploy", format = "json", data = "<message>")]
fn deploy(message: Json<DeployInput>, state: State<CodeRepo>) -> JsonValue {

    match vm::decode(&message.0.binary) {
    Ok(v) => {
        // contract address
        let addr = format!("{}", Uuid::new_v4());
        {
            let mut contracts = state.contracts.lock().unwrap();
            let addr_clone = addr.clone();
            contracts.insert(addr_clone, v);
        }
        let addr_str = addr.as_str();
        json!({"address": addr_str})
    },
    _ => json!({"error": "cannot decode the binary data"})
    }

}

// ...

fn main() {
    rocket::ignite()
        .manage(CodeRepo { contracts: std::sync::Mutex::new(HashMap::new()) })
        .mount("/", routes![transact, deploy]).launch();
}
A few gotchas here:
- The state should be added to the function signature as a request guard
- We need to lock the mutex in order to insert the value in the state
- Generating a random string can be done with the UUID crate
- Don’t forget to add the route to the main function
Then we can implement the transact function. It should read the contract address and try to get it from the managed state. Then, it will instantiate a new EVM, set the input parameters and try to run it. The last part is not pretty: In this article, I will assume that the return value is a 64-bit value on top of the stack. This is a first approximation until I learn more about how the EVM returns value.
#[post("/transact", format = "json", data = "<message>")]
fn transact(message: Json<TransactionInput>, state: State<CodeRepo>) -> JsonValue {

    let mut code: Vec<u8> = Vec::new();
    {
        let contracts = state.contracts.lock().unwrap();
        match contracts.get(&message.0.to) {
            Some(contract) => code = contract.clone(),
            None => return json!({"error": "Cannot find contract"}),
        }
    }
    let input_str = message.0.data;

    // No error handling here :D
    let v = vm::decode(&input_str).expect("Input data should be hexadecimal");
    let mut vm = Vm::new(code, params::InputParameters::new(v));

    while !vm.at_end {
        vm.interpret();
    }

    match vm.status {
        vm::VmStatus::DONE => {
            match vm.stack.pop() {
                let returned = v.low_u64();
                Ok(v) => json!({"result": returned})
                Err => json!({"error": "Tried to return by no value on top of stack"})
            }
        },
        vm::VmStatus::REVERT => json!({"error": "error while running smart contract"}),
        _ => panic!("ABORRTTTTT"),
    }

}
Yay!
Well, it does not look too bad.