NES Emulation journal: I Can display something!

Got my first screen working! The colors are super wrong because I am not using the correct palette, and there is not sprite yet but this greatly encouraging.
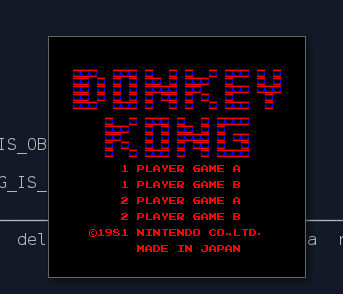
First screen in Donkey Kong

I spent a few hours debugging a black screen before getting to that result. The problem was that my interrupt handler was setting the program counter to the address located in 0xFFFC/0xFFFD, which is the reset vector, instead of 0xFFFA/0xFFFB.

Effectively, I was resetting the program every time NMI was triggered (at Vblank most of the time). I wonder what could I have done to avoid this situation. More unit testing? More ROM testing? Yea… I’ll take some time implementing tests with various test ROM.

Oh, and as a bonus, this is Donkey Kong trying to throw something…that cannot be displayed yet. Interesting, DK Kong is actually part of the background.
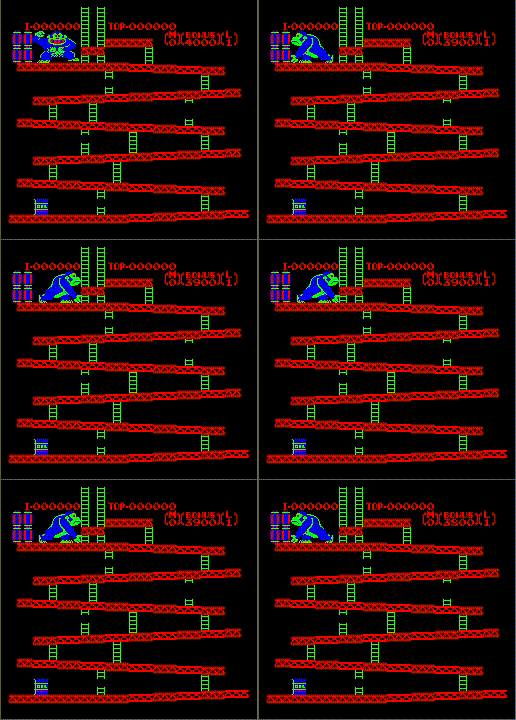
DK Kong throwing stuff

New year resolutions: 2019

In France we have new years resolutions. Usually I don’t say anything because I tend to forget them. However, as I am writing more and more online, I wonder if writing some resolutions here would be a good incentive to meet them… I believe in setting my own goals, would it be personal goals or personal goals, to avoid the routine. So let’s do it.

Read more books, with broader topics

2018 has been a good year for me. I read a bunch of great Scifi books. These are truly inspirational, but I feel I am always getting my ideas from the same source. In 2019, I aim to read at least:

  • Fiction book not related to scifi
  • Non-fiction that does not relate to technology
  • A book that seems totally at odds with my life
  • A great classic
  • Some engineering book about space engineering (yea!)

A few month ago, I read Pachinko and it was an awesome read. I need to reiterate this experience next year.

Finish my NES/Raspberry project

I want to complete my NES emulator and put it in a raspberryPi so that I can play on my TV. The emulator does not need to be perfect but I want to run at least:

  • Super Mario Bros 3 (tough one)
  • The Legend of Zelda
  • Final Fantasy

There is still a long road to go but this kind of very concrete project is the most awesome learning experience.

Contribute to Open-source

I want to start sharing more the experience I get from work and personal projects. Either it would be by contributing more to some projects on github or by writing more on this blog.

Get my Finance straight

Start saving that godamn money!

Start a new aventure

This one is less concrete and more personal. I want to do something that really matters to me and people around. Unspecified yet.

See you in one year!

Ethereum Virtual Machine in Rust - Part 5: How to execute a smart contract with Rocket (2/2)

I didn’t get to code a lot while writing the previous article so let’s fix that now! Here I will create a simple EVM that can receive message from an HTTP POST request. The smart contract will be written in assembly code (and very simple obviously).

With Rust, I will have to:

  • Create a small HTTP server that can accept POST requests with JSON data
  • Execute the smart contract with the input parameters contained in the JSON data
  • Return the result to the client that sent the HTTP request

In Assembly, I will create the following contract:

  • add accepts two integers and add them together
  • square accepts one integer and return its square

Crafting the smart contract

According to the previous post, a smart contract is structured the following way:

  • Validation step: Ensure the input data contains at least the method ID
  • Routing step: bunch of IFs to jump to the correct method
  • Extracting input data: put the method arguments on the stack
  • Execute the method
  • Add return value on top of the stack

We haven’t seen how the EVM is handling return values so for now I’ll assume we can get return values from the stack.

The add and square methods

Here we’ll implement the business logic and the parameters extraction from the input data. We’ll also be careful to not keep useless values on the stack. The code will most likely look a bit different than the one produced by solc. Remember: I used the non-optimized mode to easily follow the assembly code.

First of all, add takes two input parameters (integer). We saw before that uint is encoded as 32 bytes value in the input byte array. We can just fetch 32-bytes values at indexes 0x04 and 0x24. Then, adding two values on the stack is a simple opcode ADD.

PUSH1 0x4
CALLDATALOAD
PUSH1 0x24
CALLDATALOAD
ADD
STOP

square is similar, except that we have only one input parameter that we need to duplicate and multiple with itself.

PUSH1 0x4
CALLDATALOAD
DUP1
MUL
STOP

The STOP instruction will just tell the VM to stop the execution as we reached the end of the method. These two piece of codes will be respectively labeled add and square. I’ll replace manually the label by the real location when writing the final version of the code.

Routing to the correct method

Routing is done by comparing the 4 first bytes of the input data to the method ID of add and square. Method IDS are generated by the compiler using the Keccak hash, but to make it simpler I’ll just say that add corresponds to 0x01 and square corresponds to 0x02.

Combination of EQ and JUMPI takes care of the routing.

PUSH1 0                             
CALLDATALOAD                       
PUSH29 10000000000000000000000000000
DIV                                
DUP1                              
PUSH1 0x01                       
EQ                              
PUSH add
JUMPI
PUSH1 0x02
EQ
PUSH square
JUMPI
PUSH error
JUMP

Here we use the same trick as solc. Divide by (1 « 29) to get the 4 first bytes from the 32 bytes number. If no method ID is matched, we will jump to the error block.

Validation and error handling

Error handling will halt the execution, using the REVERT opcode. Before running the routing code, we also need to check whether the input size if at least 4 bytes. This can be done with

CALLDATASIZE
PUSH 0x4
LT
ISZERO
PUSH error
JUMPI
PUSH routing
JUMP

All in all

At the end, the assembly code is quite small. First, start by writing the size check. Then, add the routing part and the method’s implementation. Finish by adding the error handling code. JUMPDEST should not be forgotten. It will indicate that an instruction is the destination of a JUMP instruction. By the way, this smart contract is not using the memory so the free-pointer address is not set. Now, we can write this as a hexadecimal string the same way solc would compile our solidity code. I replaced the labels by the correct addresses here.

0x00    0x36    CALLDATASIZE
0x01    0x60    PUSH1 0x04
0x02    0x04
0x03    0x10    LT
0x04    0x15    ISZERO
0x05    0x60    PUSH1 error
0x06    0x4A
0x07    0x57    JUMPI
0x08    0x60    PUSH 0x00
0x09    0x00
0x0A    0x35    CALLDATALOAD
0x0B    0x7C    PUSH29 10000000000000000000000000000
0x0C    0x01
0x0D    0x00 
0x0E    0x00 
0x0F    0x00 
0x10    0x00 
0x11    0x00 
0x12    0x00 
0x13    0x00 
0x14    0x00 
0x15    0x00 
0x16    0x00 
0x17    0x00 
0x18    0x00 
0x19    0x00 
0x1A    0x00 
0x1B    0x00 
0x1C    0x00 
0x1D    0x00 
0x1E    0x00 
0x1F    0x00 
0x20    0x00 
0x21    0x00 
0x22    0x00 
0x23    0x00 
0x24    0x00 
0x25    0x00 
0x26    0x00 
0x27    0x00 
0x28    0x00 
0x29    0x90    SWAP1
0x2A    0x04    DIV
0x2B    0x80    DUP1
0x2C    0x60    PUSH 0x01
0x2D    0x01
0x2E    0x14    EQ
0x2F    0x60    PUSH1 add
0x30    0x3A
0x31    0x57    JUMPI
0x32    0x60    PUSH1 0x02
0x33    0x02
0x34    0x14    EQ
0x35    0x60    PUSH1 square
0x36    0x43
0x37    0x57    JUMPI
0x38    0x60    PUSH1 error
0x39    0x4A
0x3A    0x5b    JUMPDEST
0x3B    0x60    PUSH1 0x04
0x3C    0x04
0x3D    0x35    CALLDATALOAD
0x3E    0x60    PUSH1 0x24
0x3F    0x24
0x40    0x35    CALLDATALOAD
0x41    0x01    ADD
0x42    0x00    STOP
0x43    0x5b    JUMPDEST
0x44    0x60    PUSH1 0x04
0x45    0x04
0x46    0x35    CALLDATALOAD
0x47    0x80    DUP1
0x48    0x02    MUL
0x49    0x00    STOP
0x4A    0x5b    JUMPDEST
0x4B    0xfd    REVERT

Writing everything by hand is very error prone, no wonder high-level programming languages have been created :D

Final assembly as hexadecimal string: “0x3660041015604A576000357C0100000000000000000000000000000000000000000000000000000000900480600114603A57600214604357604a5b60043560243501005b6004358002005bfd”

We can try this without the HTTP interface using the existing code. Use this as input parameter and run the binary. It should finish with 0x04 at the top of the stack.

    let input_data = params::InputParameters::new(
        vec![0, 0, 0, 2, 0, 0, 0, 0, 0, 0, 0, 0, 0, 0, 0, 0, 0, 0, 0, 0, 0, 0, 0, 0, 0, 0, 0, 0, 0, 0, 0, 0, 0, 0, 0, 2]);

JSON interface

In real life, the user does not interact directly with the EVM. The EVM is integrated inside the ethereum client and its API is not exposed to the user. Instead, Ethereum defines a JSON-RPC API, which can be found here in the Ethereum wiki. This API exposes a lot of functions, but the one we are interested in is how to send a transaction to a smart contract, which will be executed by the EVM.

eth_sendTransaction is the one we want.

Creates new message call transaction or a contract creation, if the data field contains code.

And it accepts the following JSON file as input. Notice that the hexadecimal strings under data is actually our EVM’s input parameters packed in a byte array. to is the address of the smart contract.

params: [{
  "from": "0xb60e8dd61c5d32be8058bb8eb970870f07233155",
  "to": "0xd46e8dd67c5d32be8058bb8eb970870f07244567",
  "gas": "0x76c0",
  "gasPrice": "0x9184e72a000",
  "value": "0x9184e72a",
  "data": "0xd46e8dd67c5d32be8d46e8dd67c5d32be8058bb8eb970870f072445675058bb8eb970870f072445675"
}]

In this article, I will not use JSON-RPC to expose an API to users. Instead, I will create a simple HTTP server that will accept POST requests, extract the parameters from the body in JSON format, execute the smart contract with the given input and send back the output.

Introducing Rocket, “A Web Framework for Rust”

Rocket is a web framework developed with ease-of-use in mind. I don’t want to dwell too much on the details here as it is an article about Ethereum, so you can find more details here. Please note that Rocket is using Rust Nightly so you have to use the nightly compiler for your project (just run rustup override set nightly in your cargo directory).

First of all, let’s create a structure to represent the input data we expect from our users.

#![feature(proc_macro_hygiene, decl_macro)]
#[macro_use] extern crate rocket;
#[macro_use] extern crate rocket_contrib;
#[macro_use] extern crate serde_derive;

use rocket::State;
use rocket_contrib::json::{Json, JsonValue};
mod evm;
mod params;
use std::io;
use evm::vm::Vm;
use evm::opcode::Opcode;
use std::error::Error;
use std::env;


#[derive(Serialize, Deserialize)]
struct TransactionInput {
    // Address of the smart contract
    to: String,

    // Input data for the smart contract
    data: String,
}

The function transact will be called if a user sends a POST request with a JSON body representing TransactionInput. Then main will start Rocket. Routes are not automatically registered so you should not forget to add any additional routes using the routes! macro.

#[post("/transact", format = "json", data = "<message>")]
fn transact(message: Json<TransactionInput>) -> JsonValue {
    json!({ "status": "ok" })
}

fn main() {
    rocket::ignite().mount("/", routes![transact]).launch();
}

Now, you can compile and run the project. You can use curl, python and whatever HTTP client to test the API. In my case, I just use python with requests.

Rocket server is running!

Making a request with Python

Rocket is nice with us and will validate the request coming from from the user. Now that we have a functioning endpoint, we can implement the transact function. For each request, we instantiate a new VM and pass it the input parameters. Then we run the code until completion and return the result to the user. I will also add another endpoint to get a smart contract from a POST request and deploy it to the blockchain.

Storing smart contracts in Rocket’s managed state

The server can maintain state by using the rocket’s managed state. Note that Rocket is multithreaded so the state must be thread safe. In this case, an user can deploy a smart contract and another user can execute a transaction simultaneously, so the structure that hold smart contracts should be thread-safe.

struct CodeRepo {
    contracts: std::sync::Mutex<HashMap<String, Vec<u8>>>
}

The hashmap will match contract addresses (string) to bytecode. It is stored in a mutex to ensure the thread safeness. I only store the contracts as Vec<u8>. In reality, Ethereum has a set data structure for accounts (personal or contract). Contract accounts include a persistent state that can be accessed from the EVM code. Maybe I’ll add this functionality to the code later.

Then, the state can be added to Rocket before launch.

    rocket::ignite()
        .manage(CodeRepo { contracts: std::sync::Mutex::new(HashMap::new()) })
        .mount("/", routes![transact]).launch();

To deploy a smart contract, we will just get the hexadecimal string from the user request, generate an unique String ID and add it to the managed state. Then, when a user needs to execute the smart contract, he will have to provide this unique ID and the input parameters. Like before, we need to define a new structure to represent the deploy message. Similarly to transact, a deploy endpoint should be added. It will just decode the hexadecimal string to a vector of bytes and store it inside the managed state.

#[derive(Serialize, Deserialize)]
struct DeployInput {
    binary: String,
}

#[post("/deploy", format = "json", data = "<message>")]
fn deploy(message: Json<DeployInput>, state: State<CodeRepo>) -> JsonValue {

    match vm::decode(&message.0.binary) {
    Ok(v) => {
        // contract address
        let addr = format!("{}", Uuid::new_v4());
        {
            let mut contracts = state.contracts.lock().unwrap();
            let addr_clone = addr.clone();
            contracts.insert(addr_clone, v);
        }
        let addr_str = addr.as_str();
        json!({"address": addr_str})
    },
    _ => json!({"error": "cannot decode the binary data"})
    }

}

// ...

fn main() {
    rocket::ignite()
        .manage(CodeRepo { contracts: std::sync::Mutex::new(HashMap::new()) })
        .mount("/", routes![transact, deploy]).launch();
}

A few gotchas here:

  • The state should be added to the function signature as a request guard
  • We need to lock the mutex in order to insert the value in the state
  • Generating a random string can be done with the UUID crate
  • Don’t forget to add the route to the main function

Then we can implement the transact function. It should read the contract address and try to get it from the managed state. Then, it will instantiate a new EVM, set the input parameters and try to run it. The last part is not pretty: In this article, I will assume that the return value is a 64-bit value on top of the stack. This is a first approximation until I learn more about how the EVM returns value.

#[post("/transact", format = "json", data = "<message>")]
fn transact(message: Json<TransactionInput>, state: State<CodeRepo>) -> JsonValue {

    let mut code: Vec<u8> = Vec::new();
    {
        let contracts = state.contracts.lock().unwrap();
        match contracts.get(&message.0.to) {
            Some(contract) => code = contract.clone(),
            None => return json!({"error": "Cannot find contract"}),
        }
    }
    let input_str = message.0.data;

    // No error handling here :D
    let v = vm::decode(&input_str).expect("Input data should be hexadecimal");
    let mut vm = Vm::new(code, params::InputParameters::new(v));
    
    while !vm.at_end {
        vm.interpret();
    }

    match vm.status {
        vm::VmStatus::DONE => {
            match vm.stack.pop() {
                let returned = v.low_u64();
                Ok(v) => json!({"result": returned})
                Err => json!({"error": "Tried to return by no value on top of stack"})
            }
        },
        vm::VmStatus::REVERT => json!({"error": "error while running smart contract"}),
        _ => panic!("ABORRTTTTT"),
    }

}

Yay!

Interacting with our EVM with Python

Well, it does not look too bad.

Ethereum Virtual Machine in Rust - Part 5: How to execute a smart contract (1/2)

I need to take a step back from memory models after having written three posts about the stack and the memory. There is still a third way to save data, which is the persistent storage but I think it is about time we try to emulate a real smart contract, from the beginning.

But first of all what happens when an Ethereum peer receives a new message?

A look at Parity code

Parity-Ethereum is a Rust implementation of Ethereum (much more advanced than mine ahah). It is the second most used Ethereum client after go-ethereum according to ethernode.

It is written in Rust, so we can stay in the spirit of this series of article when looking at the source code. An Ethereum client is not only a virtual machine. It deals with many more things such as:

  • A peer-to-peer network
  • A RPC server for client’s requests
  • A consensus algorithm
  • The actual blockchain implementation

The codebase is used, but fortunately we are only going to focus on a small part of it. The VM’s interpreter is at ethcore/evm/src/interpreter/mod.rs. You can find the main loop and the instruction execution in this file. The code is actually quite straightforward and easy to read after practicing Rust a bit. The function Interpreter<Cost>::new is called to create a new Interpreter.

This function is then called by the EVM factory localed in ethcode/evm/src/factory.rs.

/// In factory.rs

/// Evm factory. Creates appropriate Evm.
#[derive(Clone)]
pub struct Factory {
	evm: VMType,
	evm_cache: Arc<SharedCache>,
}

impl Factory {
	/// Create fresh instance of VM
	/// Might choose implementation depending on supplied gas.
	pub fn create(&self, params: ActionParams, schedule: &Schedule, depth: usize) -> Box<Exec> {
		match self.evm {
			VMType::Interpreter => if Self::can_fit_in_usize(&params.gas) {
				Box::new(super::interpreter::Interpreter::<usize>::new(params, self.evm_cache.clone(), schedule, depth))
			} else {
				Box::new(super::interpreter::Interpreter::<U256>::new(params, self.evm_cache.clone(), schedule, depth))
			}
		}
	}
}

That’s cool. Now we can check wherever this factory is used to find out what happen when the Ethereum node receives a message. Easier said than done, but by following little by little the source code, you should arrive to a file called executive.rs. An executive is something that is executing (?) and can be of many kind:

  • ExecCall
  • ExecCreate
  • ResumeCreate
  • ResumeCall
  • Transfer
  • CallBuiltin This rings a bell. I guess ExecCall is used to execute the smart contract when somebody is sending a message. ExecCreate would be when somebody want to create a smart contract. Anyway, there is a big function call exec that will match on the kind of Executive and do the appropriate action. In our case, it will execute the following:
CallCreateExecutiveKind::ExecCall(params, mut unconfirmed_substate) => {
        assert!(!self.is_create);

        {
            let static_flag = self.static_flag;
            let is_create = self.is_create;
            let schedule = self.schedule;

            let mut pre_inner = || {
                Self::check_static_flag(&params, static_flag, is_create)?;
                state.checkpoint();
                Self::transfer_exec_balance(&params, schedule, state, substate)?;
                Ok(())
            };

            match pre_inner() {
                Ok(()) => (),
                Err(err) => return Ok(Err(err)),
            }
        }

        let origin_info = OriginInfo::from(&params);
        let exec = self.factory.create(params, self.schedule, self.depth);

        let out = {
            let mut ext = Self::as_externalities(state, self.info, self.machine, self.schedule, self.depth, self.stack_depth, self.static_flag, &origin_info, &mut unconfirmed_substate, OutputPolicy::Return, tracer, vm_tracer);
            match exec.exec(&mut ext) {
                Ok(val) => Ok(val.finalize(ext)),
                Err(err) => Err(err),
            }
        };

        let res = match out {
            Ok(val) => val,
            Err(TrapError::Call(subparams, resume)) => {
                self.kind = CallCreateExecutiveKind::ResumeCall(origin_info, resume, unconfirmed_substate);
                return Err(TrapError::Call(subparams, self));
            },
            Err(TrapError::Create(subparams, address, resume)) => {
                self.kind = CallCreateExecutiveKind::ResumeCreate(origin_info, resume, unconfirmed_substate);
                return Err(TrapError::Create(subparams, address, self));
            },
        };

        Self::enact_result(&res, state, substate, unconfirmed_substate);
        Ok(res)
    },

That’s a bunch of complicated code. But what is it telling me is that a new VM is created for each call, and that the parameters of the call are passed to the VM in self.factory.create. I won’t dig further in Parity code. It is very interesting to explore but also a bit overwhelming. What I learned from there is enough for now. Basically when the node receives a message, it will:

  • extract the parameters from the message
  • Create a new VM (memory and stack empty) with the message parameters.
  • Start executing the code in the VM from the first instruction

The VM starts with an empty stack and memory, but the storage is persistent so it will be in the same state as after the last contract’s execution. The message’s parameters are also injected in the VM. You can retrieve them using specials opcodes: CALLDATALOAD, CALLDATASIZE.

Dissecting a smart contract

Instead of just executing a few selected instructions, in this part I am going to follow a compiled solidity contract from the beginning.

pragma solidity ^0.4.0;


contract Example {
   
    uint x; 

    function takeOver(uint y) public {
        x = y;
    }

    function multiply(uint a, uint b) public {
        x = a * b;
    }
}

Now, let’s take a look at this smart contract binary. We have:

/* "contract.sol":25:196  contract Example {... */
      mstore(0x40, 0x80)
      jumpi(tag_1, lt(calldatasize, 0x4))
      calldataload(0x0)
      0x100000000000000000000000000000000000000000000000000000000
      swap1
      div
      0xffffffff
      and
      dup1
      0x165c4a16
      eq
      tag_2
      jumpi
      dup1
      0xab1f3be2
      eq
      tag_3
      jumpi
    tag_1:
      0x0
      dup1
      revert
        /* "contract.sol":127:194  function multiply(uint a, uint b) public {... */
    tag_2:
      callvalue
        /* "--CODEGEN--":8:17   */
      dup1
        /* "--CODEGEN--":5:7   */
      iszero
      tag_4
      jumpi
        /* "--CODEGEN--":30:31   */
      0x0
        /* "--CODEGEN--":27:28   */
      dup1
        /* "--CODEGEN--":20:32   */
      revert
        /* "--CODEGEN--":5:7   */
    tag_4:
        /* "contract.sol":127:194  function multiply(uint a, uint b) public {... */
      pop
      tag_5
      0x4
      dup1
      calldatasize
      sub
      dup2
      add
      swap1
      dup1
      dup1
      calldataload
      swap1
      0x20
      add
      swap1
      swap3
      swap2
      swap1
      dup1
      calldataload
      swap1
      0x20
      add
      swap1
      swap3
      swap2
      swap1
      pop
      pop
      pop
      jump(tag_6)
    tag_5:
      stop
        /* "contract.sol":66:121  function takeOver(uint y) public {... */
    tag_3:
      callvalue
        /* "--CODEGEN--":8:17   */
      dup1
        /* "--CODEGEN--":5:7   */
      iszero
      tag_7
      jumpi
        /* "--CODEGEN--":30:31   */
      0x0
        /* "--CODEGEN--":27:28   */
      dup1
        /* "--CODEGEN--":20:32   */
      revert
        /* "--CODEGEN--":5:7   */
    tag_7:
        /* "contract.sol":66:121  function takeOver(uint y) public {... */
      pop
      tag_8
      0x4
      dup1
      calldatasize
      sub
      dup2
      add
      swap1
      dup1
      dup1
      calldataload
      swap1
      0x20
      add
      swap1
      swap3
      swap2
      swap1
      pop
      pop
      pop
      jump(tag_9)
    tag_8:
      stop
        /* "contract.sol":127:194  function multiply(uint a, uint b) public {... */
    tag_6:
        /* "contract.sol":186:187  b */
      dup1
        /* "contract.sol":182:183  a */
      dup3
        /* "contract.sol":182:187  a * b */
      mul
        /* "contract.sol":178:179  x */
      0x0
        /* "contract.sol":178:187  x = a * b */
      dup2
      swap1
      sstore
      pop
        /* "contract.sol":127:194  function multiply(uint a, uint b) public {... */
      pop
      pop
      jump	// out
        /* "contract.sol":66:121  function takeOver(uint y) public {... */
    tag_9:
        /* "contract.sol":113:114  y */
      dup1
        /* "contract.sol":109:110  x */
      0x0
        /* "contract.sol":109:114  x = y */
      dup2
      swap1
      sstore
      pop
        /* "contract.sol":66:121  function takeOver(uint y) public {... */
      pop
      jump	// out

That’s a lot to swallow. I am going to split it a bit so that this code is easier to understand. Let’s start with the first lines:

/* "contract.sol":25:196  contract Example {... */
      mstore(0x40, 0x80)
      jumpi(tag_1, lt(calldatasize, 0x4))
      calldataload(0x0)
      0x100000000000000000000000000000000000000000000000000000000
      swap1
      div
      0xffffffff
      and
      dup1
      0x165c4a16
      eq
      tag_2
      jumpi
      dup1
      0xab1f3be2
      eq
      tag_3
      jumpi
    tag_1:
      0x0
      dup1
      revert

The first instruction mstore(0x40, 0x80) is actually storing the free memory pointer address in memory. jumpi(tag_1, lt(calldatasize, 0x4)) will move to tag_1 if the size of the input data is too small. If that’s the case, the contract will abort (revert).

If not, the input data is pushed on the stack (calldataload). The rest of the code is a bit unclear. Some operation is done with the input data (DIV, AND), and then the result is compared against 0x165c4a16 and 0xab1f3be2. If it is equal to the first value, then the code at tag_2 will be executed. If it is equal to the second value, the code at tag_3 will be executed. If you look at tag_2 and tag_3, you’ll notice that these are our two functions of the smart contract.

This piece of assembly code is just routing us to the correct function based on the input data. Before digging a bit more, I want to take a look at the rest of the assembly code generated by solc (actually, the detail of that calculation will be done in the next article). Let’s follow tag_2.

    tag_2:
      callvalue
        /* "--CODEGEN--":8:17   */
      dup1
        /* "--CODEGEN--":5:7   */
      iszero
      tag_4
      jumpi
        /* "--CODEGEN--":30:31   */
      0x0
        /* "--CODEGEN--":27:28   */
      dup1
        /* "--CODEGEN--":20:32   */
      revert
        /* "--CODEGEN--":5:7   */
    tag_4:
        /* "contract.sol":127:194  function multiply(uint a, uint b) public {... */
      pop
      tag_5
      0x4
      dup1
      calldatasize
      sub
      dup2
      add
      swap1
      dup1
      dup1
      calldataload
      swap1
      0x20
      add
      swap1
      swap3
      swap2
      swap1
      dup1
      calldataload
      swap1
      0x20
      add
      swap1
      swap3
      swap2
      swap1
      pop
      pop
      pop
      jump(tag_6)
    tag_5:
      stop
        /* "contract.sol":66:121  function takeOver(uint y) public {... */
 

The snipped ends with a jump to tag_6, which is the body of the function multiply. The snippet of code here is just extracting data from the input parameters:

  • callvalue will copy the Wei sent to this contract to the stack
  • If callvalue is 0, the contract will revert, else it will jump to tag_4
  • A bunch of instructions are done with calldataload to push a and b on the stack.

In detail:

      pop
      tag_5
      [tag_5]
      
      0x4
      [tag_5, 0x4]
      
      dup1
      [tag_5, 0x4, 0x4]
      
      calldatasize
      [tag_5, 0x4, 0x4, data_size]
      
      sub
      [tag_5, 0x4, data_size-0x4]
      
      dup2
      [tag_5, 0x4, data_size-0x4, 0x4]
      
      add
      [tag_5, 0x4, data_size]
      
      swap1
      [tag_5, data_size, 0x4]
      
      dup1
      [tag_5, data_size, 0x4, 0x4]
      
      dup1
      [tag_5, data_size, 0x4, 0x4, 0x4]
      
      calldataload
      [tag_5, data_size, 0x4, 0x4, data(offset=0x4)]
      
      swap1
      [tag_5, data_size, 0x4, data(offset=0x4), 0x4]
      
      0x20
      [tag_5, data_size, 0x4, data(offset=0x4), 0x4, 0x20]
      
      add
      [tag_5, data_size, 0x4, data(offset=0x4), 0x24]
      
      swap1
      [tag_5, data_size, 0x4, 0x24, data(offset=0x4)]
      
      swap3
      [tag_5, data(offset=0x4), 0x4, 0x24, data_size]
      
      swap2
      [tag_5, data(offset=0x4), data_size, 0x24, 0x4]
      
      swap1
      [tag_5, data(offset=0x4), data_size, 0x4, 0x24]
      
      dup1
      [tag_5, data(offset=0x4), data_size, 0x4, 0x24, 0x24]
      
      calldataload
      [tag_5, data(offset=0x4), data_size, 0x4, 0x24, data(offset=0x24)]
      
      swap1
      [tag_5, data(offset=0x4), data_size, 0x4, data(offset=0x24), 0x24]
      
      0x20
      add
      [tag_5, data(offset=0x4), data_size, 0x4, data(offset=0x24), 0x44]
      
      swap1
      [tag_5, data(offset=0x4), data_size, 0x4, 0x44, data(offset=0x24)]
      
      swap3
      [tag_5, data(offset=0x4), data(offset=0x24), 0x4, 0x44, data_size]
      
      swap2
      [tag_5, data(offset=0x4), data(offset=0x24), data_size, 0x44, 0x4]
      
      swap1
      [tag_5, data(offset=0x4), data(offset=0x24), data_size, 0x4, 0x44]
      
      pop
      pop
      pop
      [tag_5, data(offset=0x4), data(offset=0x24)]
      jump(tag_6)

In these two snippets of assembly code, we saw how the calldataload, calldatasize instructions were used to push the input data on the stack. calldataload is also used to find out what function to execute in our smart contract. There is still a missing piece though. How is the input data sent to the smart contract? How is it loaded? How do we map the value 0x165c4a16 to the correct function?

Input data in detail

Phew, that’s a lot of assembly code. We encountered a few mysteries on our way:

  • Why are we checking that input data size is less than 4?
  • How do we find out the label for the function to execute?
  • How do we get the function parameters?

But first of all, what kind of input data do Ethereum clients send? I’ll refer to this link.

Hum, unfortunatly, not much digging is required here :) The input data consists of the function to execute, plus the required parameters. They will be packed in one hexadecimal string which contains the encoded values. More details are available in Solidity documentation.

To summarize, the method ID is created by taking the first 4 bytes of the Keccak hash of the function’s signature. Then, the arguments are added to the string. In the case of our integer, they will be converted to their hexadecimal form, padded 32 bytes (256 bit, size of the EVM word). In the binary code, we check that the input data size if at least 4! This is because we need to get the method ID. Then, the method ID is extracted using some bytes operations.

Now, take a look at the following image. It explains all our calls to CALLDATALOAD.

Input data in detail

First, we get 32 bytes from index 0x0 (CALLDATALOAD(0x0)). It includes our method ID and a bit of the first parameter so we need to extract only 4 bytes. This is done by dividing by (1 « (29*8)) and extracting the 4 first bytes with (AND 0xFFFFFFFF). I wonder why the code didn’t compile to a right shift only here. Maybe the optimized version is doing that. Then, we get the first parameter with CALLDATALOAD(0x4) and the second parameter with CALLDATALOAD(0x24). After that, it is business as usual!

Model the input data and CALLDATALOAD/CALLDATASIZE in our VM

The input data is, as we saw, just a byte array that return words. The following can be used.

use self::uint::U256;

pub struct InputParameters {
    data: Vec<u8>,
}

impl InputParameters {

    pub fn new(data: Vec<u8>) -> InputParameters {
        InputParameters { data }
    }
    
    pub fn get(&self, index: usize) -> U256 {
        self.data[index..index+32].into()
    }
    
    pub fn size(&self) -> U256 {
        U256::from(self.data.len())
    }
}

#[cfg(test)]
mod tests {

    use super::*;
    #[test]
    fn test_parameters_ok() {
        let data = (0..32).collect();
        
        let params = InputParameters::new(data);
        let size = params.size();

        assert_eq!(32, size.as_u32());
        let bigint = params.get(0);

        assert_eq!(31, bigint.byte(0));
        assert_eq!(0, bigint.byte(31));
    }
}

Then, the VM itself needs to be modified to accept InputParameters as input data. We also need to add the opcodes and implementation of CALLDATALOAD and CALLDATASIZE.

use params;
pub struct Vm {
    pub code: Vec<u8>, // This is the smart contract code.
    pub pc: usize, 
    pub stack: Vec<U256>,
    pub mem: Memory,

    // Parameters received in the message
    pub input_data: params::InputParameters,

    // detect if code ended.
    pub at_end: bool,
}

impl Vm {

    pub fn new_from_file(filename: &str, input_data: params::InputParameters) -> Result<Vm, Box<Error>> {
        let mut f = File::open(filename)?;
        let mut buffer = String::new();
        f.read_to_string(&mut buffer)?;

        let code = decode(&buffer)?;
        Ok(Vm { code: code, pc: 0, stack: Vec::new(), mem: Memory::new(), input_data, at_end: false})
    }

    // ...
            Opcode::CALLDATASIZE(_) => {
                let size = self.input_data.size();
                self.stack.push(size);
            },
            Opcode::CALLDATALOAD(_) => {
                // This is a bit dirty. As first approximation, there is not
                // way we would have a size larger than 32 bits. Lets try it
                // and if it fails, it will panic (which is what I want)
                let idx = self.stack.pop().unwrap().as_u32() as usize;
                let data = self.input_data.get(idx);
                self.stack.push(data);
            },
    // ...

This article is getting quite long so I’ll stop here. In next article, I am going to write EVM code in assembly that should read input data and execute it using my VM. Then, I’ll take a look at the persistent storage. There is still so much to explore and I’ve only taken a look at the EVM…

Ethereum Virtual Machine in Rust - Part 4: After the Stack, the Memory

In my previous posts about the Ethereum VM, I focused on very simple examples, using Value Types. These are variable that will always be passed by value according to the Solidity documentation.

We saw that passing by value involved the stack. However, Reference types, which are types that do not always fit in 256 bit, should be store either in the memory or in the storage. As opposed to the storage, the memory does not persist between contract’s execution.

Reference Types are:

  • arrays
  • struct
  • mapping

According to the documentation, the default location for function parameters is memory and the default for local variables is storage. State variables are forced to have their location in storage.

Well, what a bummer. If I want to exhibit the usage of memory in our compiled code, I’d need to use a more complex example.

Solidity code

pragma solidity ^0.4.0;

contract Example {
    struct Position {
        address owner;
        uint id;
    }
    
    uint x; 
    function takeOver() public {
        Position memory p = Position(msg.sender, 0);
        x = p.id;
    }
}

Again a useless contract. I just want to exhibit the use of the memory without involving the storage too much. I swear by the end of this post series you’d be able to understand what happens for a real contract :’).

What I want to understand here is:

  • How a struct is defined in binary code
  • How memory is used to store p

First, let’s read a bit about the memory in the EVM specifications.

Specifications for memory

Memory layout

The memory model is a simple word-addressed byte array.

The stack had two basic operations: push and pop. The memory is word addressed so we can retrieve data at specific addresses in the byte array. Inserting is also done wherever in the array.

In solidity, the memory follows a specific layout (Doc). Four 32 bytes slots are reserved for solidity usage:

  • 0x00 to 0x3f: Scratch space for hashing methods
  • 0x40-0x5f: Free memory pointer
  • 0x60-0x7f: Zero slot

Solidity always places new objects at the free memory pointer and memory is never freed (this might change in the future).

When creating an object in memory, we first need to take a look at the first available address. Then we can insert the object in memory at this address. The first available address, i.e. the free memory pointer, can be loaded with mload(0x40). This instruction will load a 32 bytes address.

Opcodes

According to the yellow paper, the instructions that deal with the memory are:

  • SHA3: Compute Keccak-256 hash
  • CALLDATACOPY: Copy input data in current environment to memory
  • CODECOPY: Copy code running in current environment to memory
  • EXTCODECOPY: Copy an account’s code to memory
  • MLOAD: Load word from memory
  • MSTORE: Save word to memory
  • MSTORE8: Save byte to memory
  • CREATE: Create a new account with associated code
  • CALL: Message-call into an account
  • RETURN: Halt execution returning output data

You can see that there is not arithmetic nor control flow involved in these instructions. These instructions are the domain of the stack.

Something to note about memory is that the amount of gas to pay will grow with the memory usage.

Decompiling our compiled code

As always, solc is a dear an annotate the .evm code for us.

    tag_6:
        /* "contract.sol":191:214  Position(msg.sender, 0) */
      0x40
      dup1
      mload
      swap1
      dup2
      add
      0x40
      mstore
      dup1
        /* "contract.sol":200:210  msg.sender */
      caller
        /* "contract.sol":191:214  Position(msg.sender, 0) */
      0xffffffffffffffffffffffffffffffffffffffff
      and
      dup2
      mstore
      0x20
      add
        /* "contract.sol":212:213  0 */
      0x0
        /* "contract.sol":191:214  Position(msg.sender, 0) */
      dup2
      mstore
      pop
        /* "contract.sol":171:214  Position memory p = Position(msg.sender, 0) */
      swap1
      pop
        /* "contract.sol":228:229  p */
      dup1
        /* "contract.sol":228:232  p.id */
      0x20
      add
      mload
        /* "contract.sol":224:225  x */
      0x0
        /* "contract.sol":224:232  x = p.id */
      dup2
      swap1
      sstore
      pop
        /* "contract.sol":134:239  function takeOver() public {... */
      pop
      jump	// out
        /* "contract.sol":25:241  contract Example {... */
 

Well, this is slightly more complicated. Let’s decompose it and show the current stack and memory.

Initial situation:

stack: [...]
memory: ... |0x40 -> addr1 | .... | ....

The memory just contains the first available address (addr1). The stack state is unknown.

        /* "contract.sol":213:237  Position(msg.sender, id) */
      0x40
      [ 0x040 ]
      ... |0x40 -> addr1 | ...
      
      dup1
      [0x40, 0x40]
      ... |0x40 -> addr1 | ...
      
      mload
      [0x40, addr1]
      ... |0x40 -> addr1 | ...
      
      swap1
      [addr1, 0x40]
      ... |0x40 -> addr1 | ...
      
      dup2
      [addr1, 0x40, addr1]
      ... |0x40 -> addr1 | ...
      
      add
      [addr1, addr1 + 0x40]
      ... |0x40 -> addr1 | ...
      
      0x40
      [addr1, addr1+0x40, 0x40]
      ... |0x40 -> addr1 | ...
      
      mstore
      [addr1]
      ... | 0x40 -> addr1+0x40 | ...

Well this is funky. What happened here is that we got the free memory pointer from the memory, and set a new value for this free memory pointer. The new value is the original value increased by 64 bytes. So now, we have a free memory address on the stack that we can use to store some data. In the memory, we have stored the next free memory address that we can use later.

The question here is why does the code only allocate two times 32 bytes. Let’s continue.

      dup1
      [addr1, addr1]
      
      caller
      [addr1, addr1, CALLER]
      
      0xfffffffffffffffffffffffffffffffffffffff
      [addr1, addr1, CALLER, 0xffffffffffffffffffffffffffffffffffffffff]
      
      and
      [addr1, addr1, CALLER MASKED]
      
      dup2
      [addr1, addr1, CALLER MASKED, addr1]
      ... | 0x40 -> addr1+0x40 | .. 
      
      mstore
      [addr1, addr1]
      ... | 0x40 -> addr1+0x40 | ... | addr1 -> CALLER MASKED | ...
      
      0x20
      [addr1, addr1, 0x20]
      
      add
      [addr1, addr1+0x20]
    
      0x0
      [addr1, addr1+0x20, 0]
      
      dup2
      [addr1, addr1+0x20, 0x0, addr1+0x20]
      
      mstore
      [addr1, addr1+0x20]
      ... | 0x40 -> addr1+0x40 | ... | addr1 -> CALLER MASKED | addr1+0x20 -> 0x0 | ...
 

Now we have our answer as why only 2 times 32 bytes were allocated. It was to store the msg.sender and 0 that are the members of our structure. The address of p is addr1. The content of Position is known at compile-time so solc knows about many bytes are required for Position.

(By the way, I have no idea about the 0xffffffffffffffffffffffffffffffffffffffff AND. If you know its use please leave me a message).

Now for the rest of the code.

      pop
      [addr1]
      
      swap1
      [addr1, unknown] // something that was already on the stack. 
      
      pop
      [addr1]
      
      dup1
      [addr1, addr1]
      
      0x20
      [addr1, addr1, 0x20]
      
      add
      [addr1, addr1+0x20]
      
      mload
      [addr1, 0x0]
      
      0x0
      [addr1, 0x0 from mload, 0x0]
      
      dup2
      [addr1, 0x0 from mload, 0x0, 0x0 from mload]
      
      swap1
      [addr1, 0x0 from mload, 0x0 from mload, 0x0]
      
      sstore
      [addr1, 0x0 from mload]
      
      pop
      [addr1]
        
      pop
      []
      
      jump	// out

Okay now it looks like something we’ve seen before. We want to store p.id in x. Solidity will store x at address 0x0 in the storage. It will first load p.id from memory. The address of this field is just address of p + offset of field ID, which is addr1 + 0x20.

Nice ! I think we’re ready to emulate that with Rust.

Emulation in Rust

As always, a few opcodes are not implemented (whoops). PUSH32, MLOAD, MSTORE.

In order to avoid duplicating code too much, I refactored a bit the enumeration to accept directly U256 in PUSHX values.

// in opcode.rs
    // Push operations
    PUSH1(usize, U256), // 0x60
    PUSH2(usize, U256), // 0x61
    PUSH32(usize, U256),

// in vm.rs

// next function
            0x60 => {
                let value = self.extract_u256(1);
                self.pc += 2;
                Opcode::PUSH1(addr, value)
            },
            0x61 => {
                let value = self.extract_u256(2);
                self.pc += 3;
                Opcode::PUSH2(addr, value)
            },
            0x73 => {
                let value = self.extract_u256(32);
                self.pc += 33;
                Opcode::PUSH32(addr, value)
            }


// Vm.extract_u256

    fn extract_u256(&mut self, to_extract: usize) -> U256 {
        let mut bytes = vec![0;32];
        for i in  0..to_extract {
            let value = self.code[self.pc+i+1];
            bytes[32-to_extract+i] = value;
        }

        U256::from_big_endian(&bytes)
    }
 

That’s much less complexity. I guess we could factored it more to get the numbers of byte to read for each PUSH instruction and group everything under one match case. For now it should be fine.

Now, to implement MLOAD and MSTORE, we need to have an implementation of the memory. According to specifications, we should be able to load words from the memory (32-bytes) and we should be able to store words but also individual bytes. The memory can also grow.

Let’s use a vector of bytes. The first bytes will be reserved according to solidity specs.

By the way, saving the free memory pointer at 0x40 is from Solidity specification, not the EVM.

A vector initial size is 0. When calling instructions such as MSTORE or MLOAD, a certain address is specified. If the address is out of range of the current memory, we need to resize the vector. In go-ethereum, this is done by resize up to the requested index + a certain amount of bytes. See here:

  • https://github.com/ethereum/go-ethereum/blob/cab1cff11cbcd4ff60f1a149deb71ec87413b487/core/vm/memory_table.go
  • https://github.com/ethereum/go-ethereum/blob/b66f793443f572082d24f115e706532a620ba3ee/core/vm/memory.go

I will do something similar. Simply use a structure wrapping a Vec<u8>. Resize it if an instruction needs to access an address. For our tests, the following should do the trick:

// memory.rs
extern crate uint;

use self::uint::U256;


pub struct Memory {
    data: Vec<u8>,
}

impl Memory {

    pub fn new() -> Memory {
        Memory { data: Vec::new() }
    }

    pub fn resize(&mut self, new_size: usize) {
        if self.data.len() < new_size {
            self.data.resize(new_size, 0);
        }
    }

    // We only get words from the memory
    pub fn get_word(&self, addr: usize) -> U256 {
        // will panic if oob
        U256::from_big_endian(&self.data[addr..addr+32])
    }

    pub fn set_byte(&mut self, addr: usize, b: u8) {
        self.data[addr] = b;
    }

    pub fn set_word(&mut self, addr: usize, w: U256) {
        let mut bytes = vec![0; 32];
        w.to_big_endian(&mut bytes);

        for i in 0..bytes.len() {
            self.data[i+addr] = bytes[i];
        }
    }
}

We can see the 4 operations mentioned above:

  • Resize in case the address requested is out of bound
  • Get by word
  • Set a word or a byte

Now for the MLOAD and MSTORE implementation, it is easy. First get the address, then resize the memory (might do nothing if address already in range). At last, either Store or Load.

// In vm.rs:interpret
            Opcode::MLOAD(_addr) => {
                let offset = self.stack.pop().unwrap();
                let loaded_value = self.mem.get_word(offset.as_u64() as usize);
                self.stack.push(loaded_value);
            },
            Opcode::MSTORE(_addr) => {
                let offset = self.stack.pop().unwrap();
                let w = self.stack.pop().unwrap();
                self.mem.set_word(offset.as_u64() as usize, w);
            },
            Opcode::MSTORE8(_addr) => {
                // stored as big endian so we get the last byte
                let offset = self.stack.pop().unwrap();
                let b = self.stack.pop().unwrap().byte(31);
                self.mem.set_byte(offset.as_u64() as usize, b);
            },

Before executing these instructions, we need to resize our memory. I added a function that will return an Option. It will contain the new size of the memory if we need to resize.

fn get_new_size(&self, code: &Opcode) -> Option<usize> {
        match code {
        Opcode::MLOAD(_) | Opcode::MSTORE(_) => {
            Some(self.stack.last().unwrap().as_u64() as usize + 32)
        },
        Opcode::MSTORE8(_) => {
            Some(self.stack.last().unwrap().as_u64() as usize + 1)
        },
        _ => None  
        }
    }

And right before the execution match:

        match self.get_new_size(&op) {
            Some(n) => self.mem.resize(n),
            _ => {}
        }

Let’s try something. I will try to execute the following code.

0x60
0x01 // push 1
0x60
0x50 // push 0x50
0x80
0x91 // SWAP2
0x90 // SWAP1
0x52 // store 1 at 0x50
0x51 // load from 0x50
0x00 // halt

At the end, we should have 0x01 on top of the stack.

When debugging, I get the following output:

Please type either c, s or q
c
0x0     PUSH1   Place 1-byte item on the stack
c
0x2     PUSH1   Place 1-byte item on the stack
c
0x4     DUP1    Duplicate 1st stack item.
s
pc:5

Stack:
|2:     [0, 0, 0, 0, 0, 0, 0, 0, 0, 0, 0, 0, 0, 0, 0, 0, 0, 0, 0, 0, 0, 0, 0, 0, 0, 0, 0, 0, 0, 0, 0, 80]|
|1:     [0, 0, 0, 0, 0, 0, 0, 0, 0, 0, 0, 0, 0, 0, 0, 0, 0, 0, 0, 0, 0, 0, 0, 0, 0, 0, 0, 0, 0, 0, 0, 80]|
|0:     [0, 0, 0, 0, 0, 0, 0, 0, 0, 0, 0, 0, 0, 0, 0, 0, 0, 0, 0, 0, 0, 0, 0, 0, 0, 0, 0, 0, 0, 0, 0, 1]|
c
0x5     SWAP2   Swap 1st and 3rd stack items.
s
pc:6

Stack:
|2:     [0, 0, 0, 0, 0, 0, 0, 0, 0, 0, 0, 0, 0, 0, 0, 0, 0, 0, 0, 0, 0, 0, 0, 0, 0, 0, 0, 0, 0, 0, 0, 1]|
|1:     [0, 0, 0, 0, 0, 0, 0, 0, 0, 0, 0, 0, 0, 0, 0, 0, 0, 0, 0, 0, 0, 0, 0, 0, 0, 0, 0, 0, 0, 0, 0, 80]|
|0:     [0, 0, 0, 0, 0, 0, 0, 0, 0, 0, 0, 0, 0, 0, 0, 0, 0, 0, 0, 0, 0, 0, 0, 0, 0, 0, 0, 0, 0, 0, 0, 80]|
c
0x6     SWAP1   Swap 1st and 2nd stack items.
s
pc:7

Stack:
|2:     [0, 0, 0, 0, 0, 0, 0, 0, 0, 0, 0, 0, 0, 0, 0, 0, 0, 0, 0, 0, 0, 0, 0, 0, 0, 0, 0, 0, 0, 0, 0, 80]|
|1:     [0, 0, 0, 0, 0, 0, 0, 0, 0, 0, 0, 0, 0, 0, 0, 0, 0, 0, 0, 0, 0, 0, 0, 0, 0, 0, 0, 0, 0, 0, 0, 1]|
|0:     [0, 0, 0, 0, 0, 0, 0, 0, 0, 0, 0, 0, 0, 0, 0, 0, 0, 0, 0, 0, 0, 0, 0, 0, 0, 0, 0, 0, 0, 0, 0, 80]|

Please type either c, s or q
c
0x7     MSTORE  Save word to memory
s
pc:8

Stack:
|0:     [0, 0, 0, 0, 0, 0, 0, 0, 0, 0, 0, 0, 0, 0, 0, 0, 0, 0, 0, 0, 0, 0, 0, 0, 0, 0, 0, 0, 0, 0, 0, 80]|
c
0x8     MLOAD   Load word from memory
s
pc:9

Stack:
|0:     [0, 0, 0, 0, 0, 0, 0, 0, 0, 0, 0, 0, 0, 0, 0, 0, 0, 0, 0, 0, 0, 0, 0, 0, 0, 0, 0, 0, 0, 0, 0, 1]|

It does not look too bad. Obviously, if we were aiming for a production-quality VM, we would need to implement many many more tests to ensure the behaviour of our VM is entirely correct.

That was quite a lot to cover! Next time, I’ll take a small break from the different models of memory in the EVM and I’ll talk about how to execute a contract from an user’s input data.